こんちゃわ。Pocolです。
相も変わらず最適化でヒーヒーいっています。
ライティングシェーダって複数のマテリアルをサポートするとために,大体Uber Shaderになると思うのですが…
それだとやっぱりswtich-caseなどの分岐で重くなりがちです。
分岐を除くと,占有率の改善がみられ,速くなったりすることがあります。
そのため「分岐を無くそう!」というのが今回のネタで,それを実現するための資料について紹介します。
Deferred Lighting in Uncharted 4
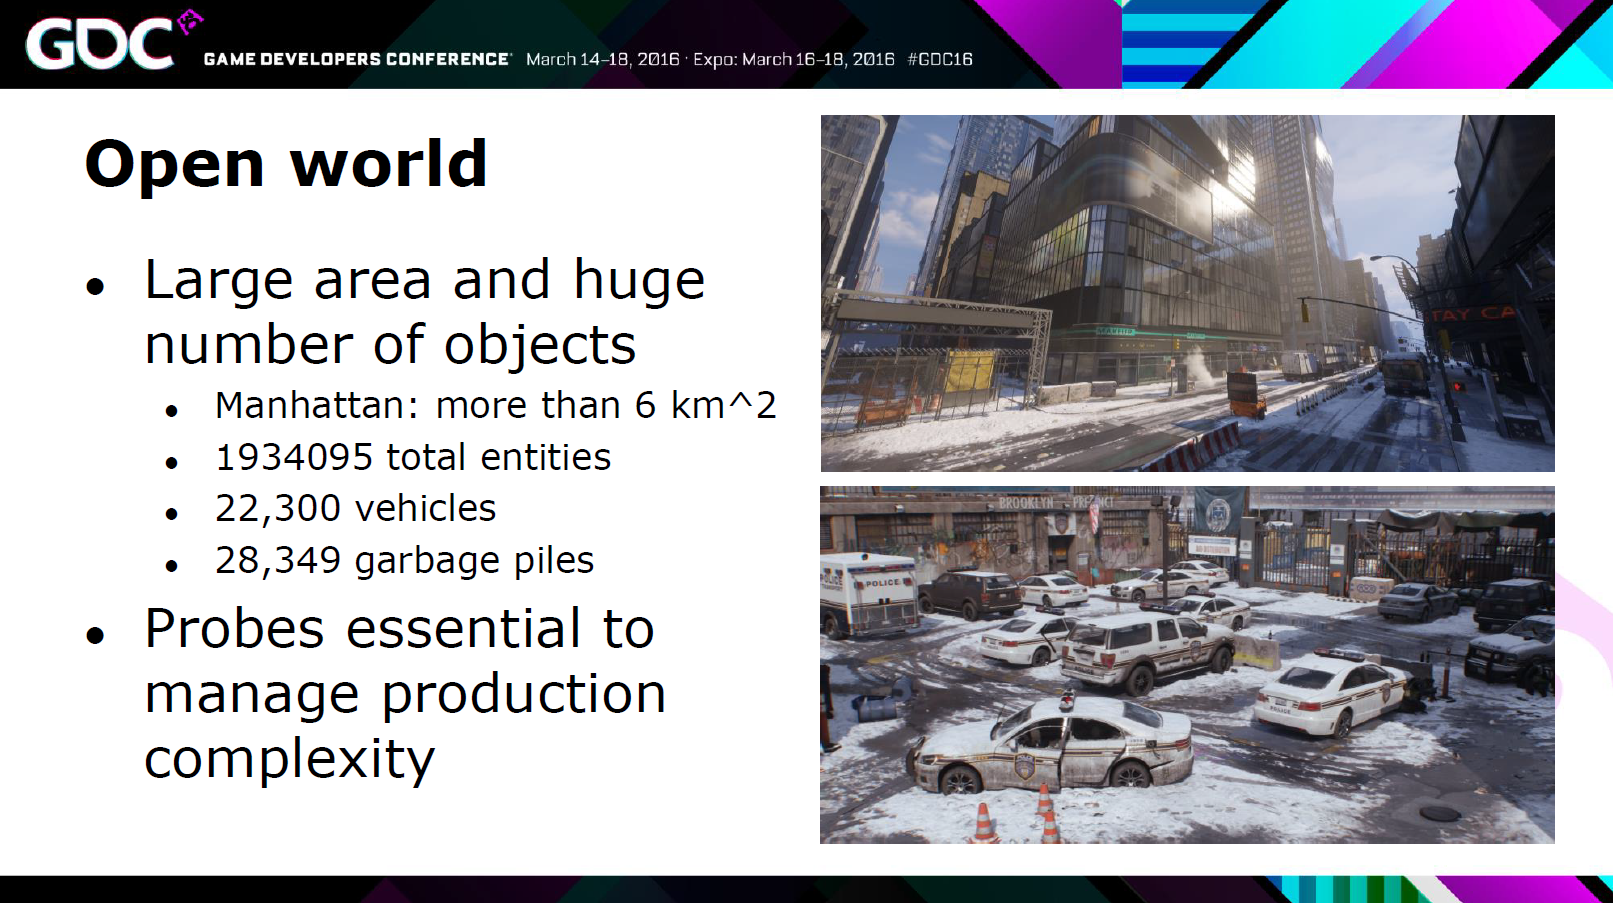
まず,1つ目は「Deferred Lighting in Uncharted 4」です。
これはSIGGRAPH 2016のAdvances in Real-Time Rendering Courseで発表されています。
資料は下記からダウンロードできます。
https://advances.realtimerendering.com/s2016/index.html
もう8年前の資料なんですね。びっくり!
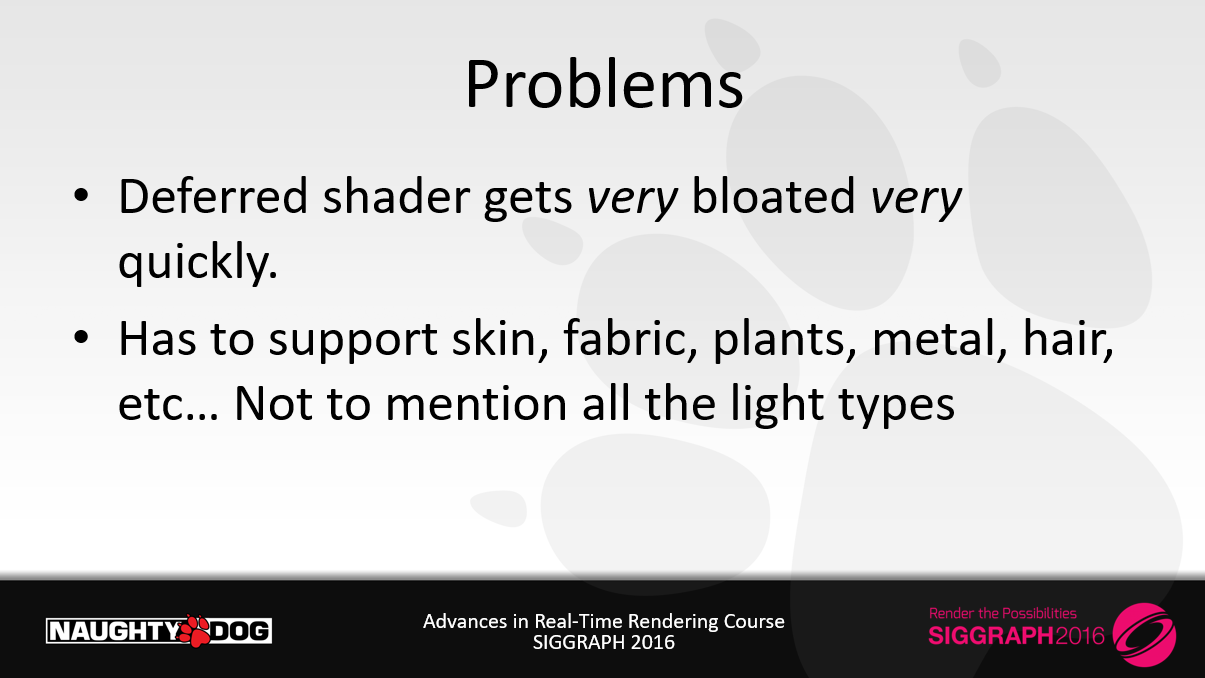
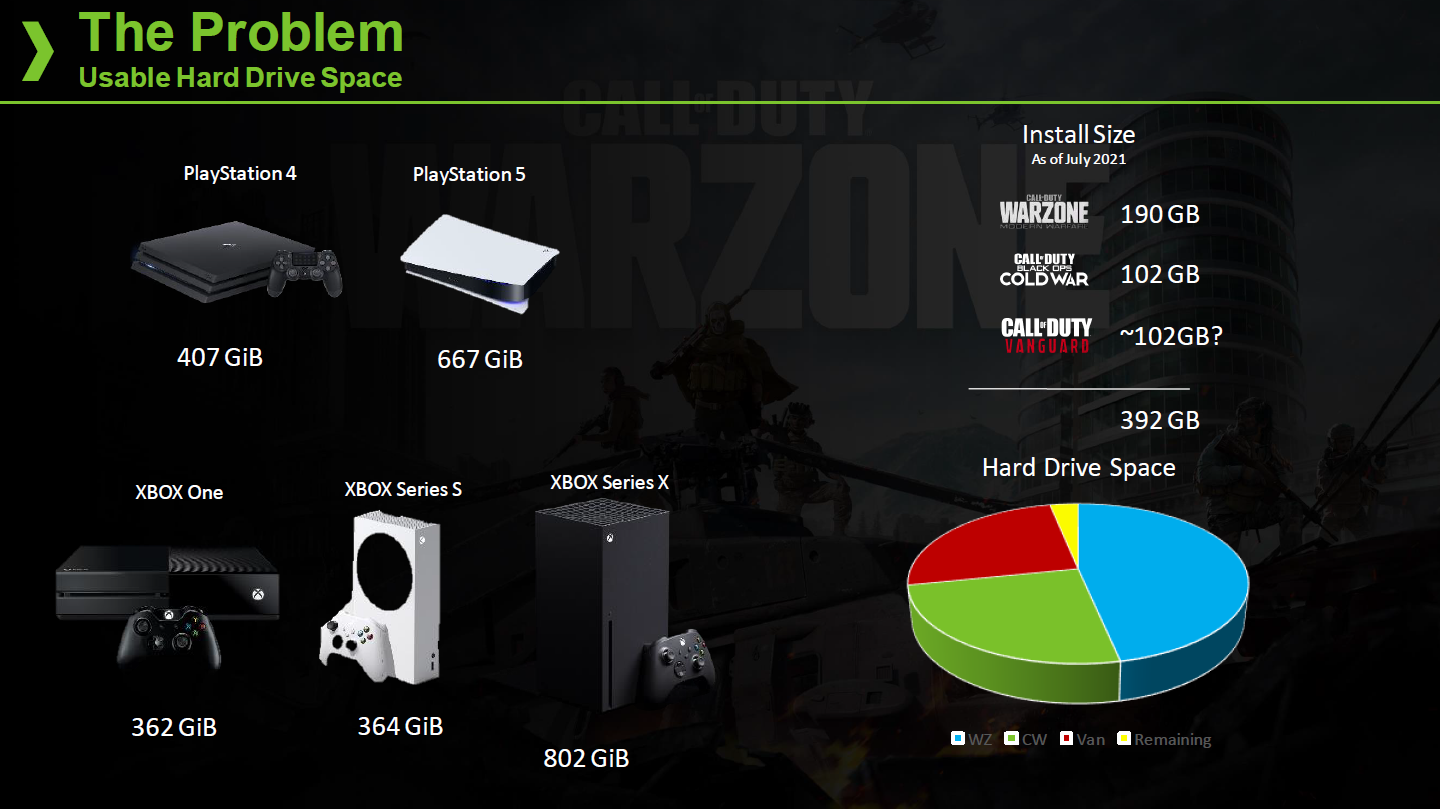
ディファードシェーディングすぐに肥大化します。
スキン,布,植物,メタル,髪など…をサポートする必要があります。すべてにライトタイプについて言及はしません。
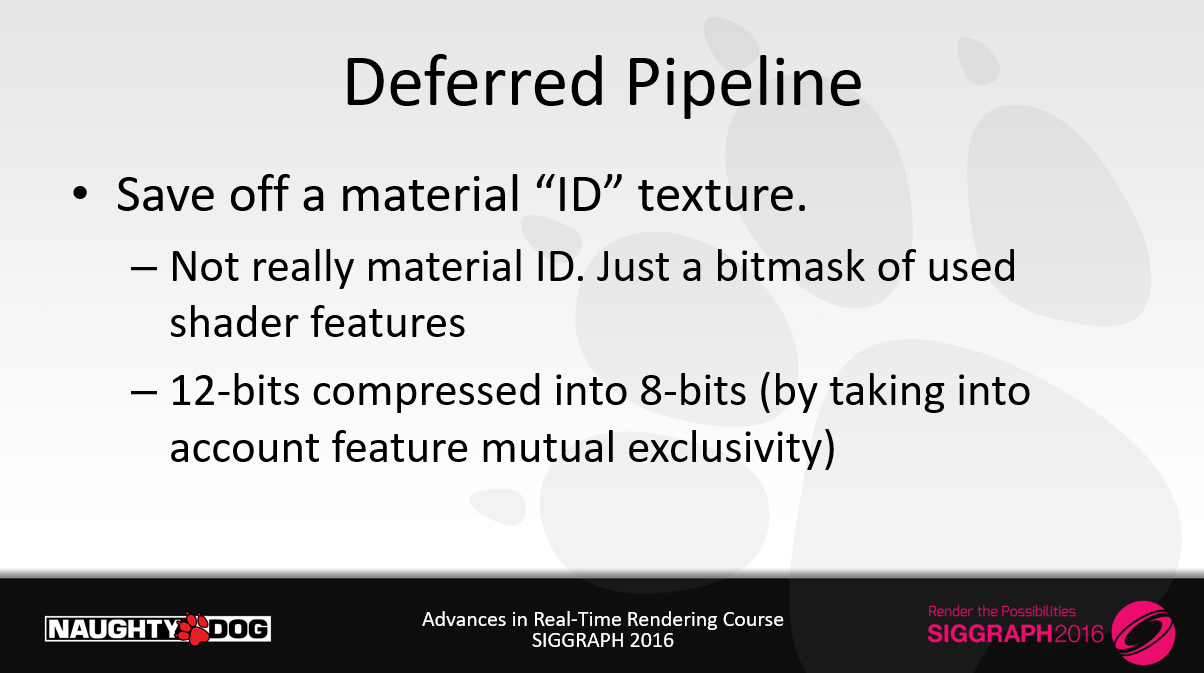
マテリアル”ID”テクスチャを保存します。
– 実際のマテリアルIDではありません。単にシェーダの使用されるシェーダ機能のビットマスクです。
– 12bitを8bitへ圧縮(機能の相互排他性を考慮)
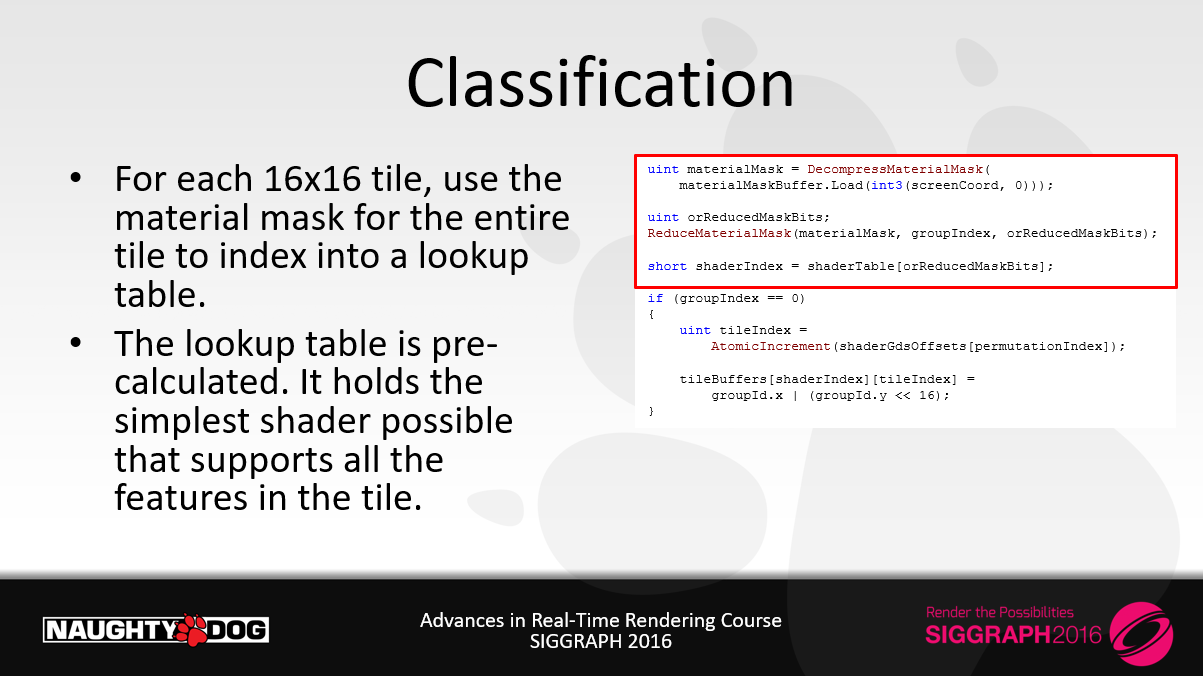
・各16×16タイルについて、タイル全体のマテリアルマスクを使用してルックアップテーブルにインデックスを付けます。
・ルックアップテーブルは事前に計算されています。タイル内のすべての機能をサポートする、可能な限りシンプルなシェーダーを保持します。
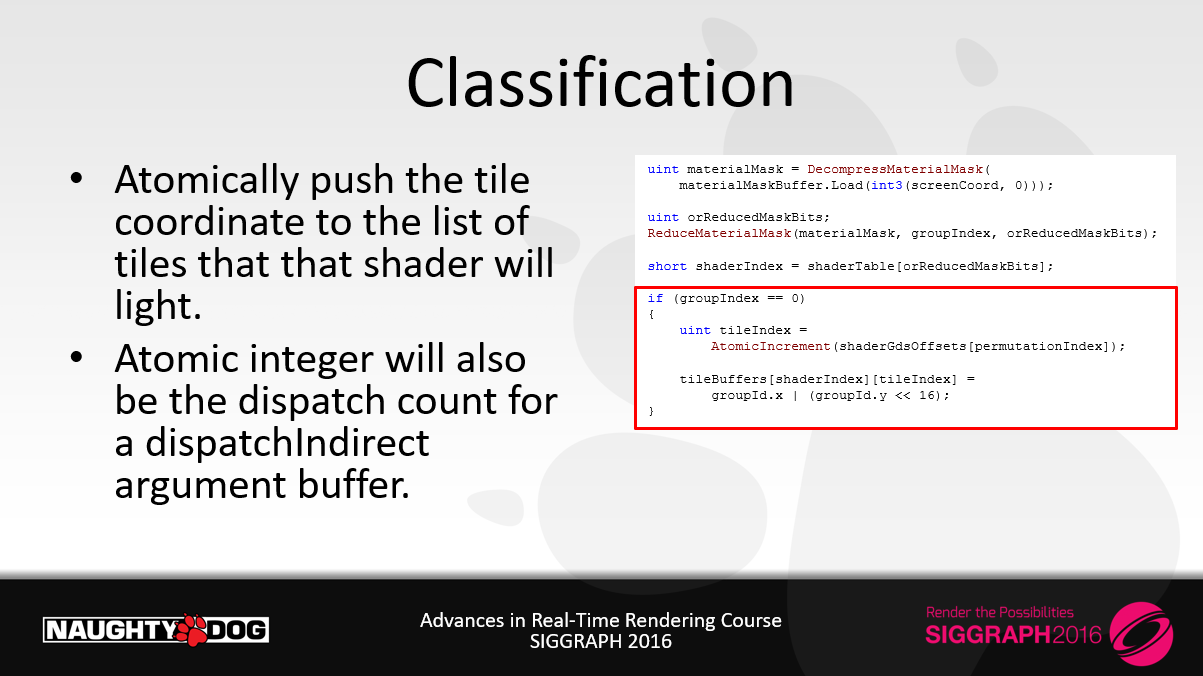
・アトミックにタイル座標を、そのシェーダーがライティングするタイルのリストにプッシュします。
・アトミック整数は dispatchIndirect 引数バッファのディスパッチカウントにもなります。
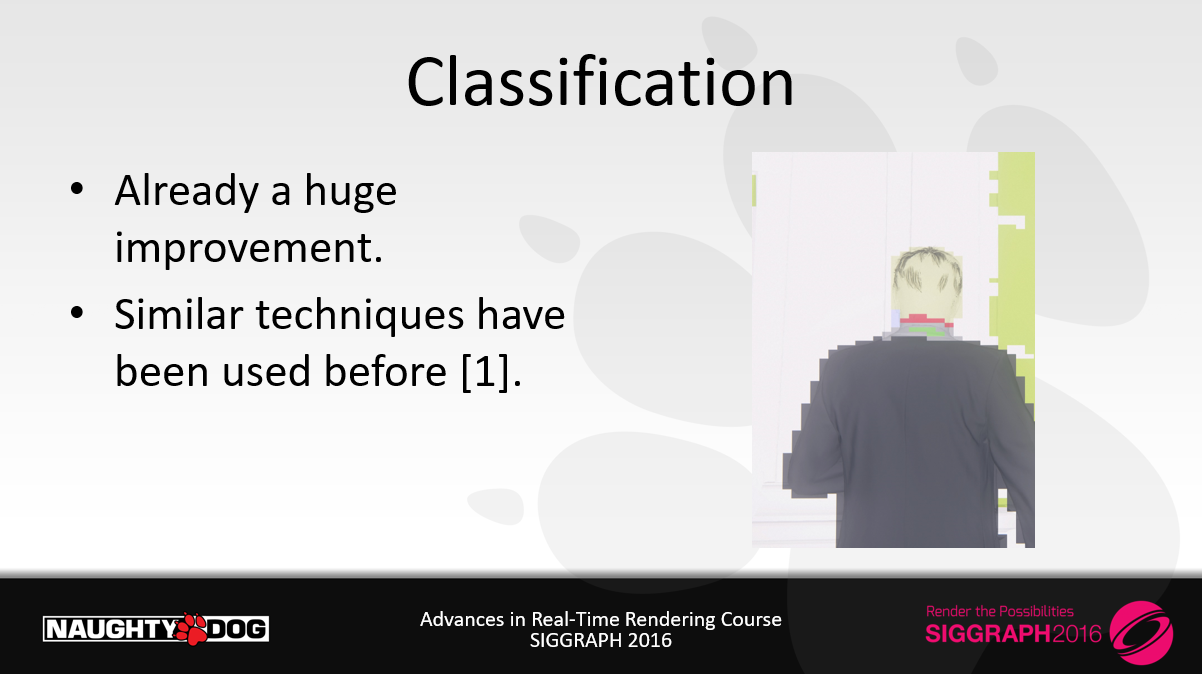
・既に大きな改善です。
・類似したテクニックは[1]で使用されています。
[1] SPU-Based Deferred Shading in Battlefield 3, http://www.dice.se/news/spu-based-deferred-shading-battlefield-3-playstation-3/
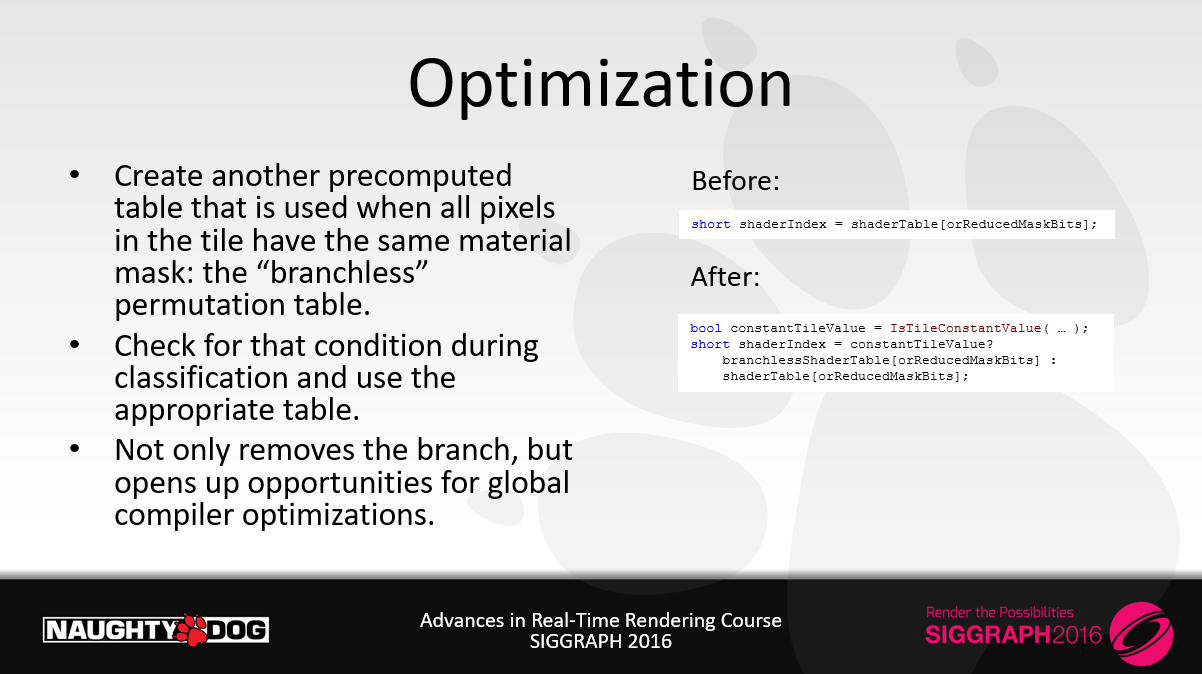
・タイル内のすべてのピクセルが同じマテリアルマスクを持つ場合に使用される、事前に計算されたもう1つのテーブル、「ブランチレス」のpermutationテーブルを作成します。
・クラス分けの際にその条件をチェックし、適切なテーブルを使用します。
・分岐をなくすだけでなく、グローバルなコンパイラ最適化の機会を開きます。
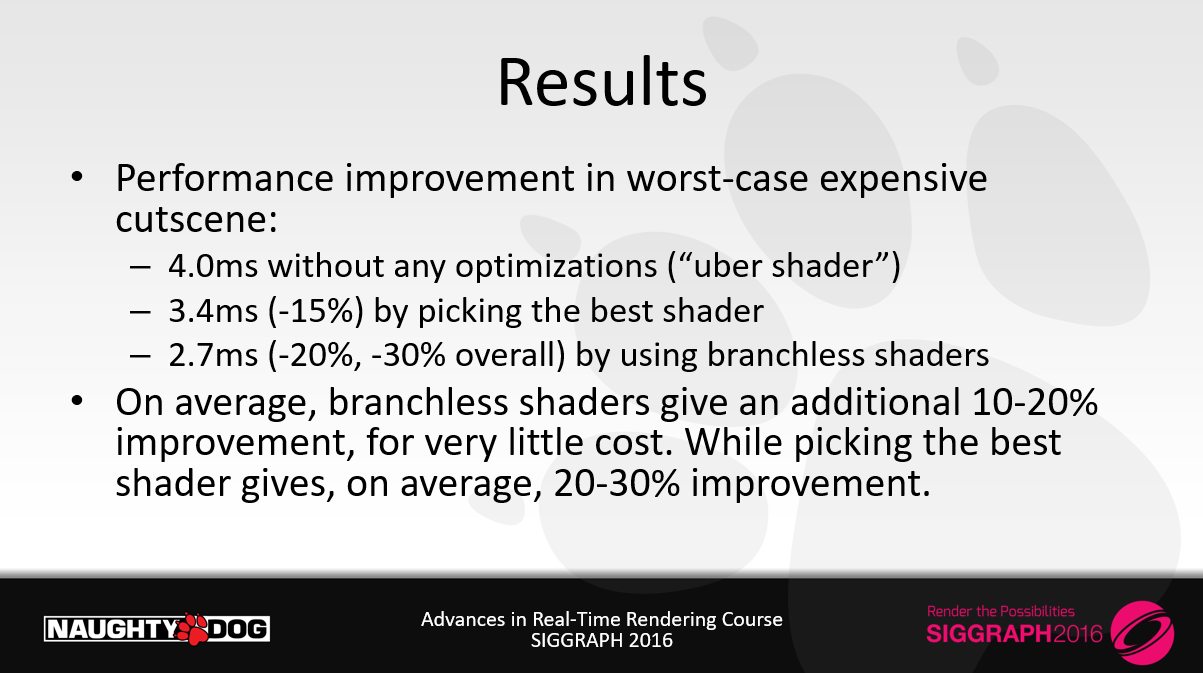
・最も悪い場合である高価なカット―シーンにおけるパフォーマンス改善
ー 4.0ms 最適化無し(“uber shader”)
ー 3.4ms (-15%) 最も良いシェーダを選択することによる
ー 2.7ms (-20%, -30% 全体的に) ブランチレスシェーダを使用することによる
・平均して、ブランチレス・シェーダーは、わずかなコストで、さらに10~20%の改善をもたらします。一方、最適なシェーダーを選ぶと、平均して20~30%の改善が得られます。
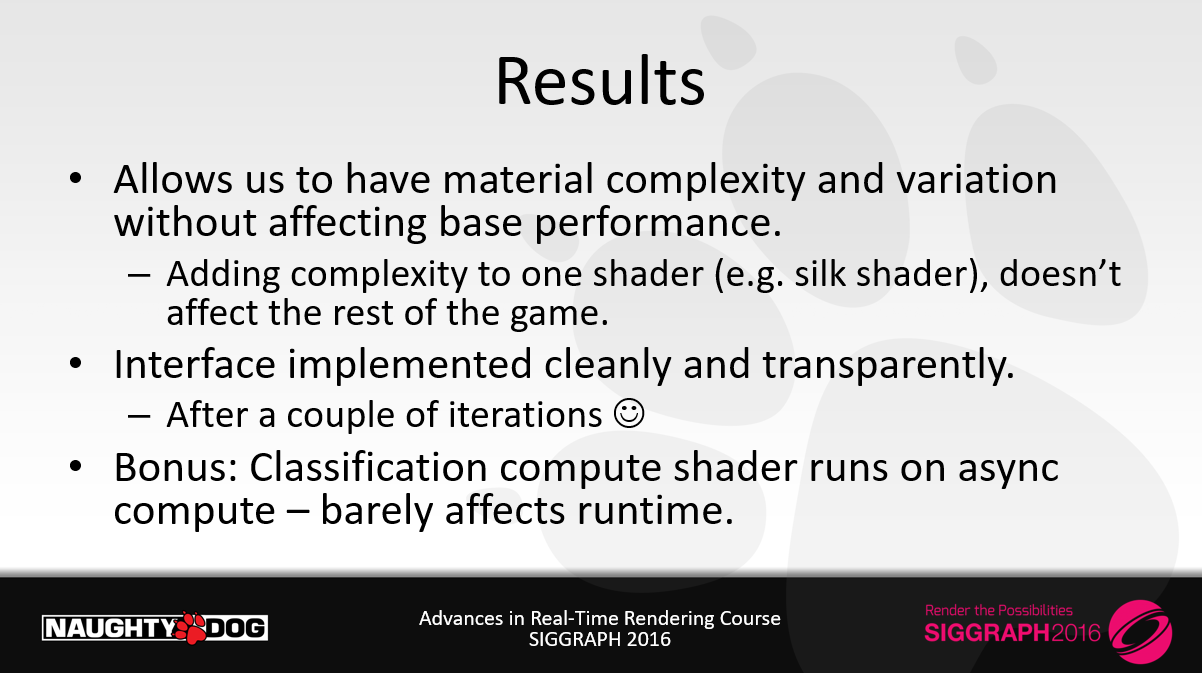
・基本性能に影響を与えることなく、マテリアルの複雑さやバリエーションを持たせることができます。
ー1つのシェーダー(例えばシルクシェーダー)に複雑さを加えても、ゲームの他の部分には影響しません。
・インターフェイスはクリーンかつ透過的に実装されています。
ー何度か繰り返した後
・ボーナス:分類コンピュートシェーダーは非同期コンピュートで実行され、ランタイムにはほとんど影響しません。

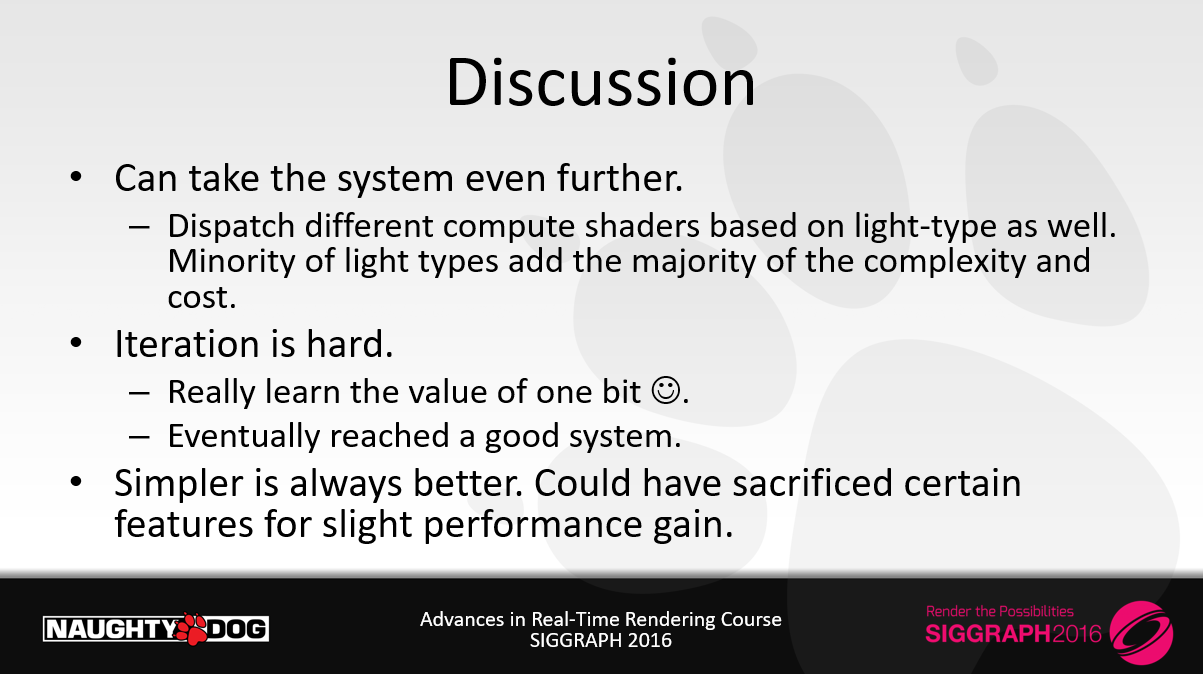
・システムをさらに進化させることができる。
ーライトタイプに基づいて、異なるコンピュートシェーダーをディスパッチすることもできる。少数派のライトタイプは、複雑さとコストの大部分を追加します。
・イテレーションは難しい
ー本当に1ビットの価値を学ぶ。
ー最終的には良いシステムに到達した。
・よりシンプルなものは常に良いです。わずかな性能向上のために、ある機能の犠牲を避けられたと思います。
該当スライドは以上です。
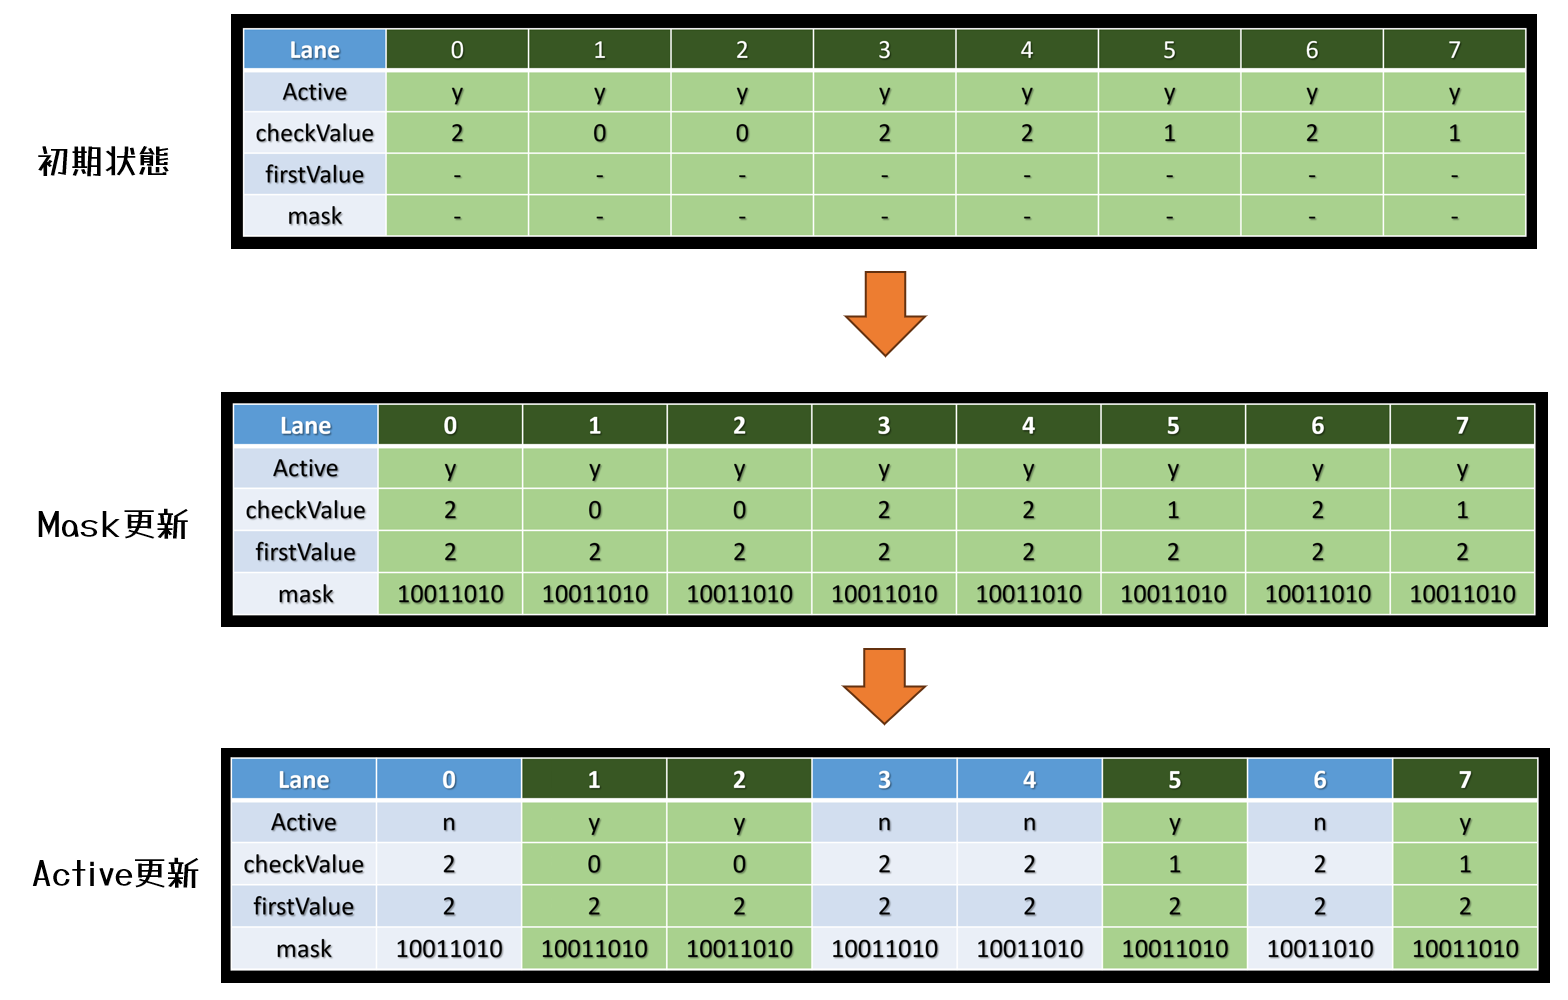
上記で述べられているように,タイルごとに必要なシェーダを分類分けを行います。
非同期コンピュートで実行し,処理時間を隠蔽します。
Uncharted 4では16×16ピクセルのタイルにして,分類分けを実行し,groupId.xを下位16ビット,group.yを上位16ビットとして32bitにパッキングし,バッファに格納します。
同時に,Shader Permutationごとにカウンタをアトミックにインクリメントしますし,dispatchのカウントバッファとして利用します。
こうすることで,必要な数だけコンピュートシェーダを起動することができます。
Grappling With Performance: Rendering Optimization Strategies In Rumbleverse
つづいて,”Grappling With Performance: Rendering Optimization Strategies In Rumbleverse”という資料で,GDC 2023で発表された資料です。
こちらは昨年なので,比較的に最近の資料ですね。
下記に資料がアップされています。
https://gdcvault.com/play/1028790/Grappling-with-Performance-Rendering-Optimization
こちらはライティングではなくReflectionとSubsurfaceが重いという話に焦点が当てられています。
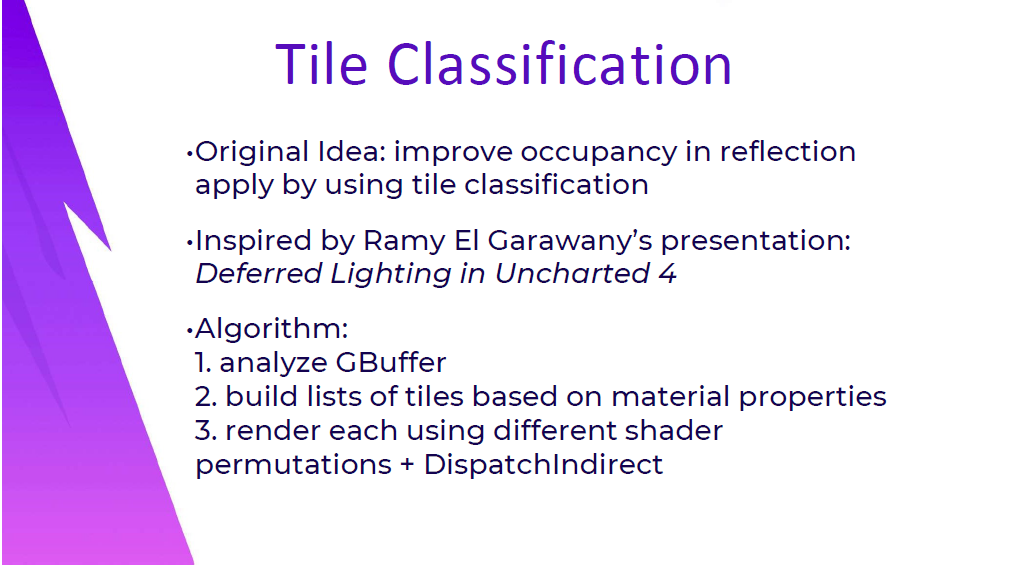
・オリジナルアイデア:タイル分類を使用することで、リフレクションを適用する際の占有率を向上させます。
・Ramy EI Garawanyのプレゼンテーション:Deferred Lighting in Uncharted 4にインスパイアされています。
・アルゴリズム:
1. G-Buffer解析します。
2. マテリアルプロパティに基づいてタイルのリストを構築する。
3. 異なるshader permutations + DispatchIndirect を用いてそれぞれ描画します。
リフレクションに費やされる重い時間は、ここでも同じように最適化できると思いました。8×8のピクセルグループのGバッファプロパティを見て、存在するマテリアルに基づいてリストを構築するタイル分類シェーダを書きます。そして、各リストを DispatchIndirect を使って、各ディスパッチに異なるshader permutationsをバウンドしてレンダリングします。
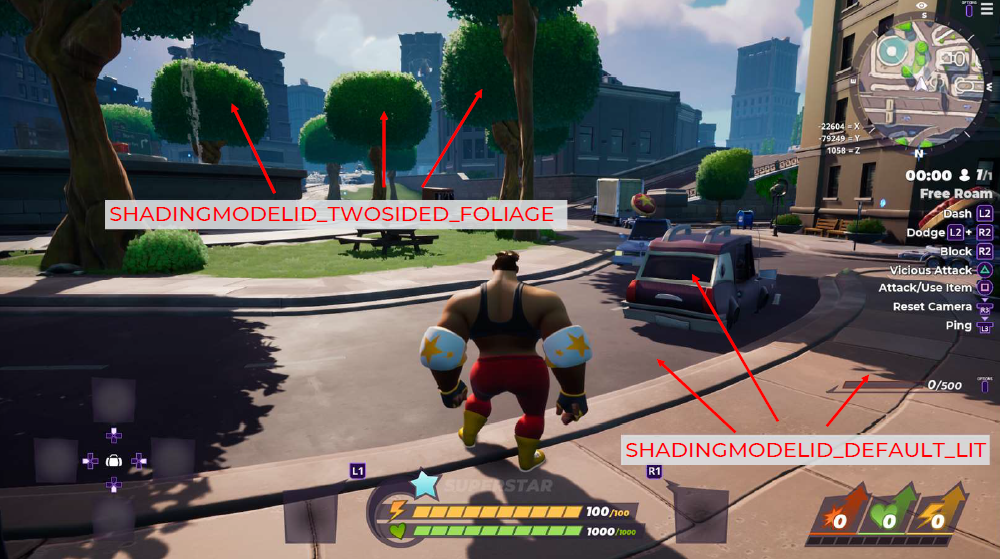
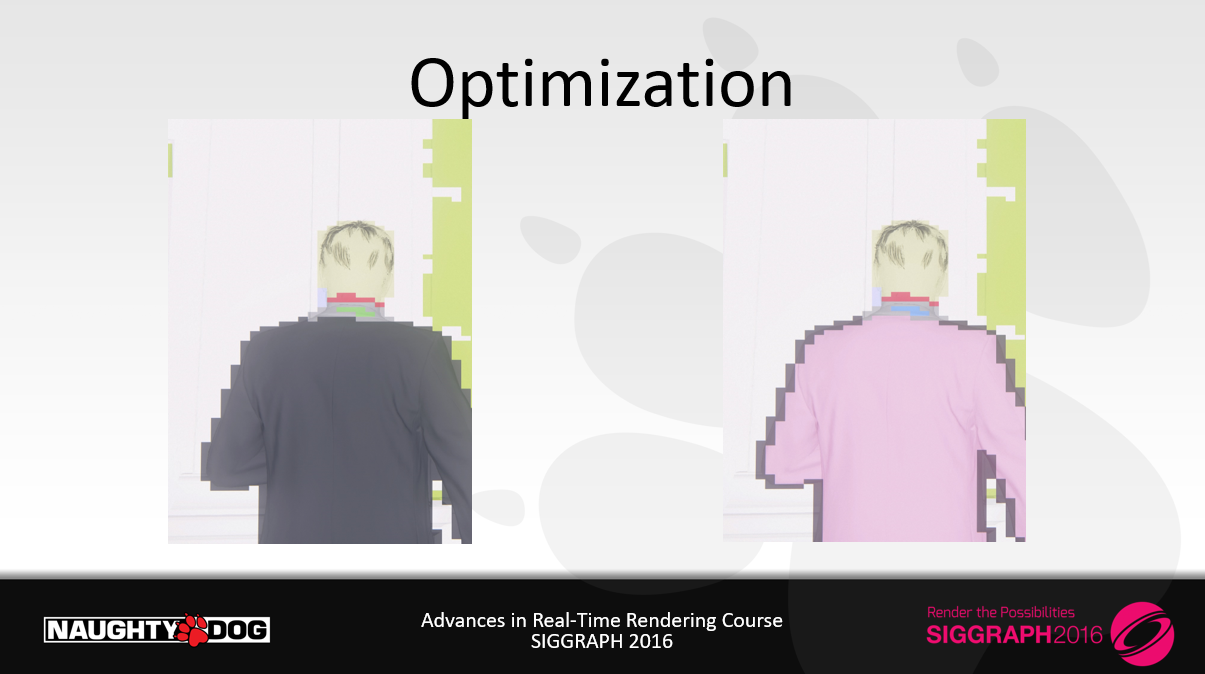
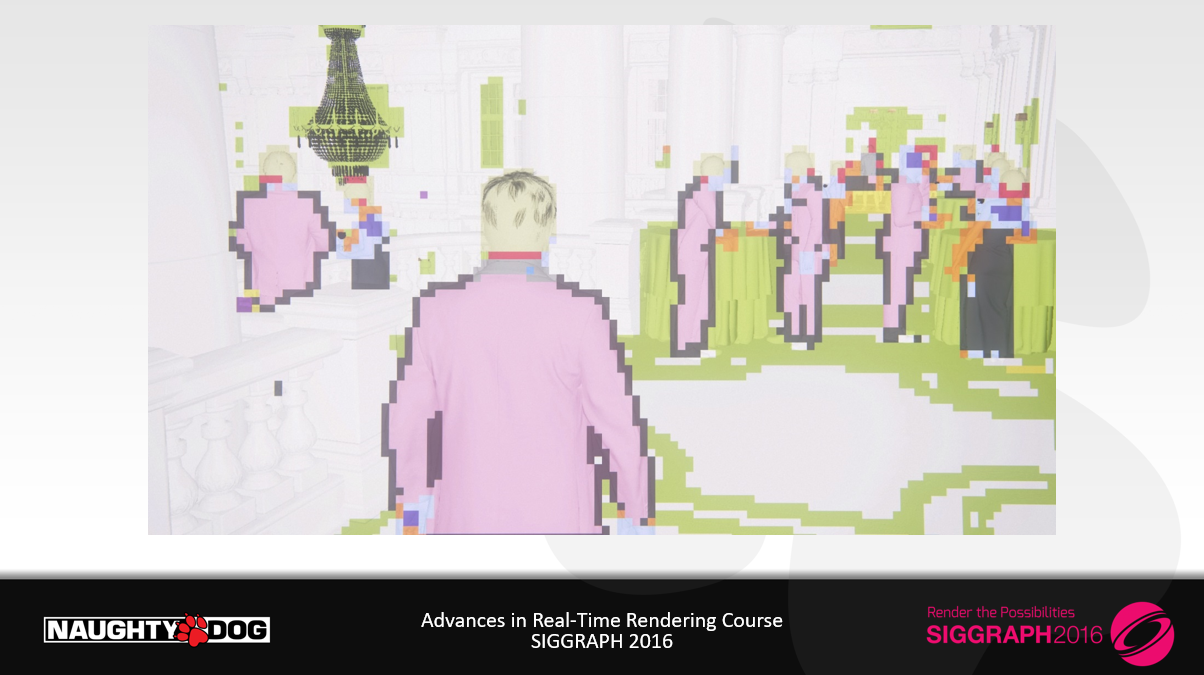
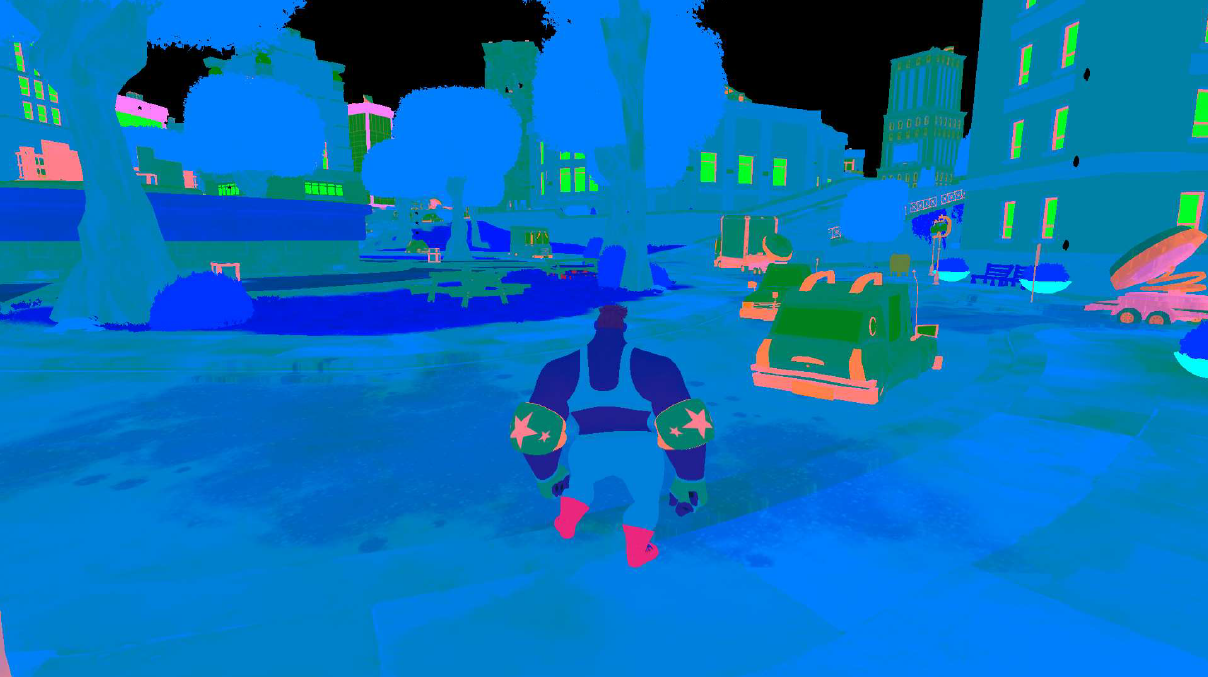
例えば、このフレームでは、すべてデフォルトでライティングしているピクセルや、両面フォリッジでライティングしているピクセルをはっきりと見ることができます。
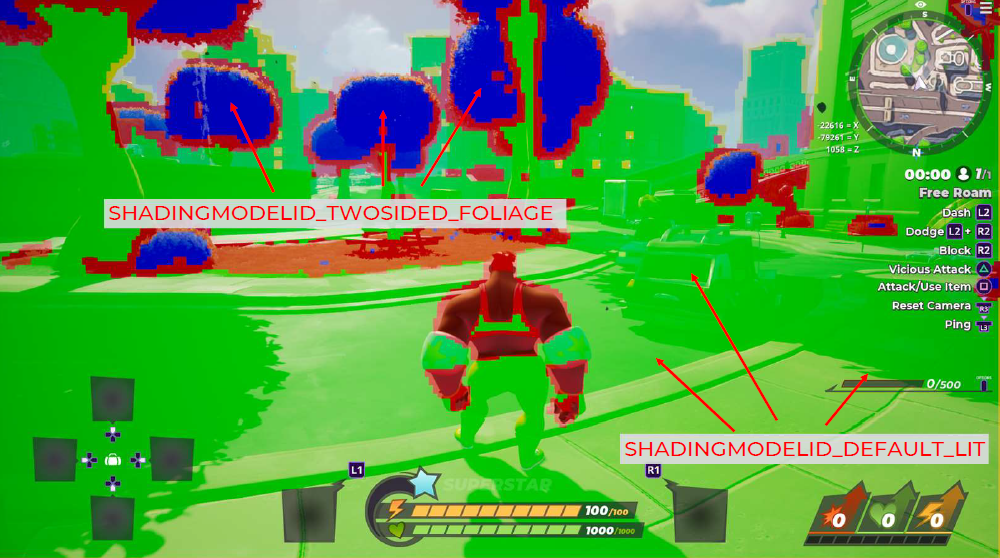
そしてここで、実際のタイル分類の視覚化を見ることができます。緑のタイルはデフォルトのライティング、青はすべてのフォリッジ、そして赤は「複雑」でフルシェーダーを実行するシェーディングパスを含んでいます。
しかし、この処理で最も重要だったのは、このタイルまでで、タイルは完全にカリングされ、実行時間に最も大きな影響を与えました。このことから、タイルの分類をSSR+SSSからのカリングワークロードに対しても使用し、分類を実行するコストをレンダリングの複数のステップで共有する方法について考えるようになりました。
最速のウェイブフロントは、決して起動しないウェイブフロントであることを忘れないでください!
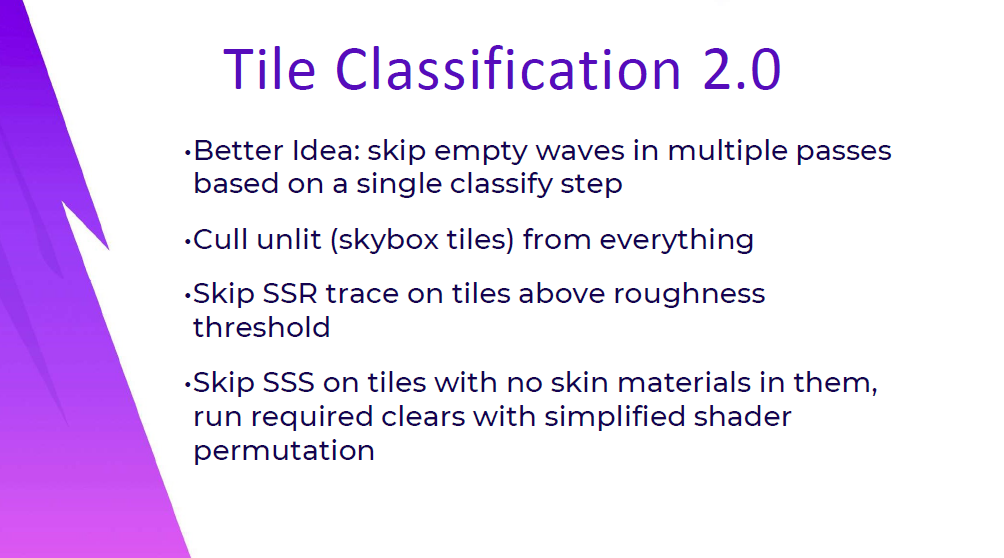
すべてのパスからライティングのないタイルをカリングし、すべてのピクセルがSSRトレースをトリガーするには粗すぎるかどうかの分類を追加し、スキンマテリアルがないタイルのSSSをスキップし、クリアする必要がありますが,完全なSSSセットアップを必要としないタイルの簡略化クリアを実行します。
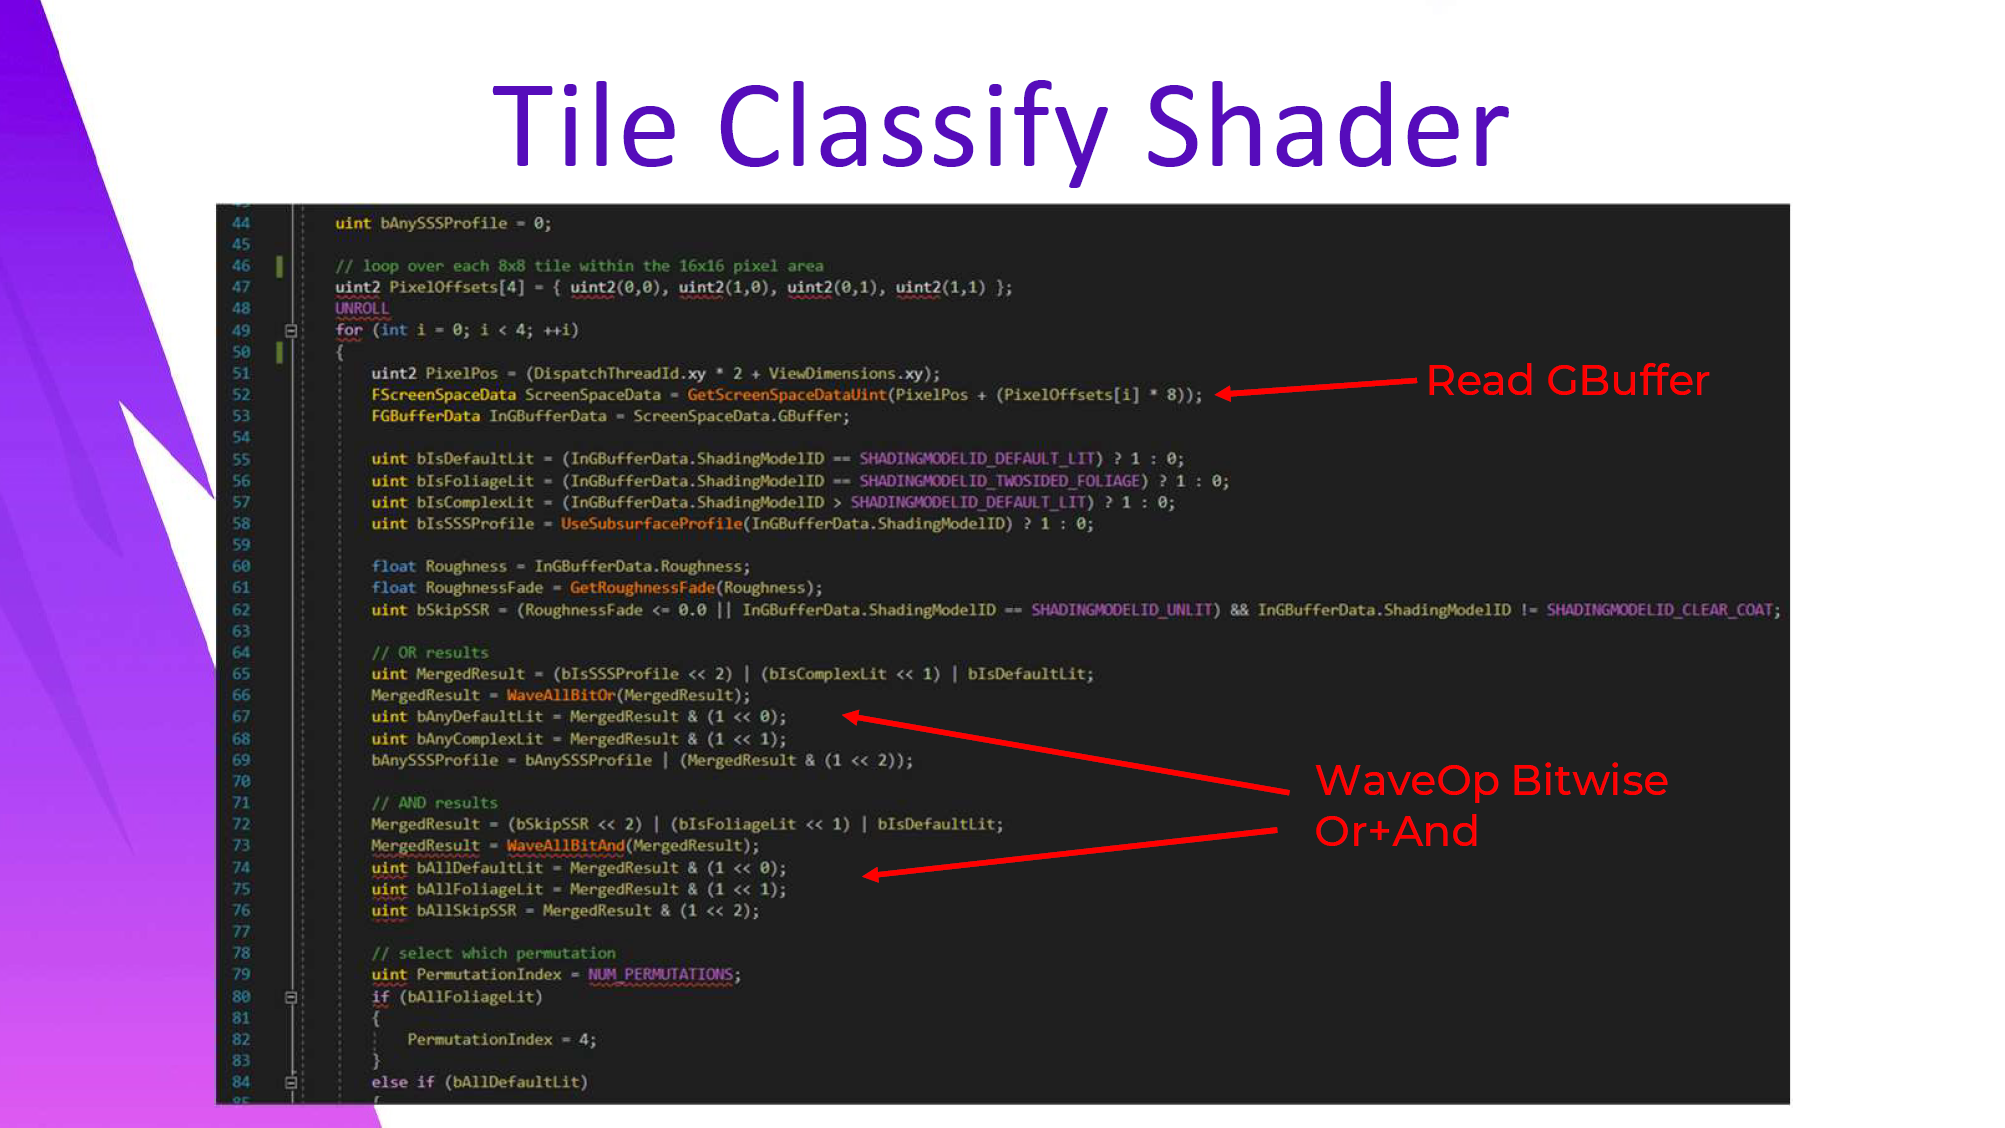
Tile Classifyシェーダーのコードで何が起こっているかを少し見てみましょう。分類は8×8タイルで行われますが、サブサーフェススキャッタリングは半分の解像度で行われるため、各グループは16×16のエリアをカバーします。UE4 の GetScreenSpaceDataUnit 関数で gbuffer プロパティをサンプリングした後、wave ops を使用して各 8×8 タイルのビットマスクをマージします。
コードでは、UE4シェーダーAPIコマンドの WaveAllBitOr と WaveAllBitAnd で起こっていることがわかります。これらのウェーブ操作の後、ウェーブフロントの各スレッドは MergedResult に同じマスク値を保持します。
ウェーブ操作を使用する利点の1つは、コンパイラがMergedResultがwave全体で均一であることを知っているため、waveコマンドに続くロジックがすべてスカラーALUになることです。
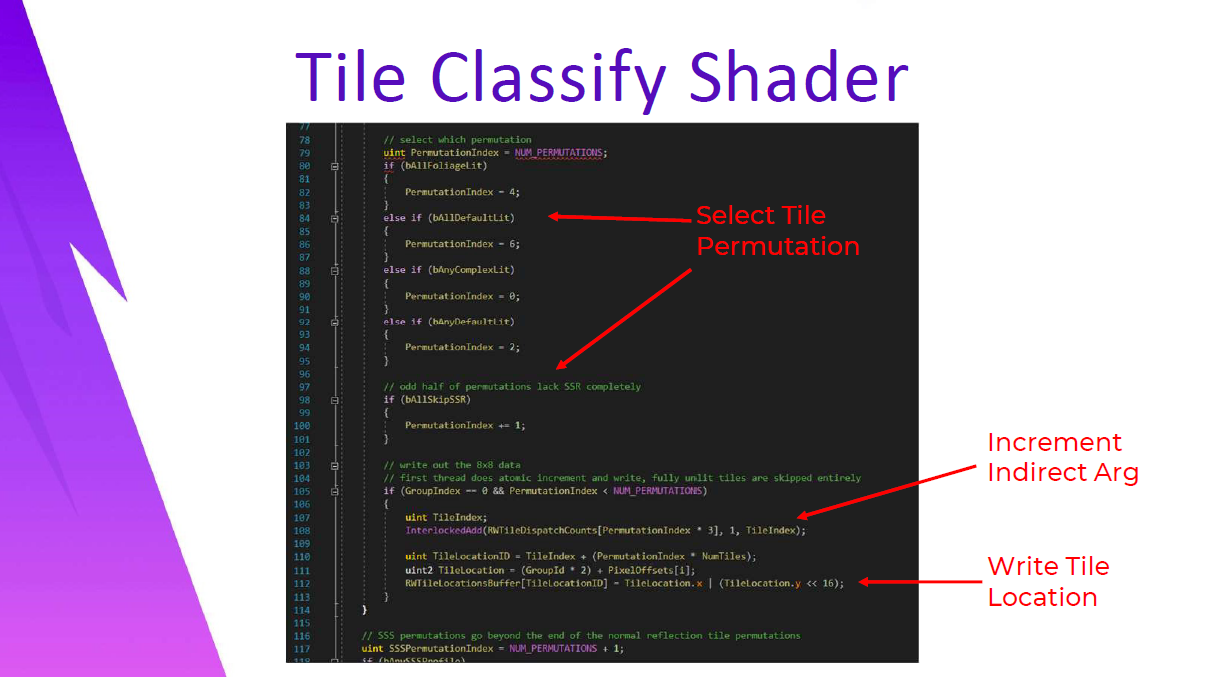
次に、ウェーブ全体にわたってMergedResultに保持されているビットに基づいてタイルのshader permutationが選択され、結果が最初のスレッドによって書き込まれますinterlocekdされた加算がカウントで発生し、タイル位置バッファにマップされるタイルの一意のインデックスを取得します。タイル位置バッファは、画面上の特定のタイルのピクセル位置を保持し、適用シェーダーで各タイルのピクセル位置を再構築するために使用されます。
なお、8×8タイルを選んだのは、GCNで1ウェーブフロント(64スレッド)のサイズだからです。アンチャーテッド4では16×16タイルを使用し、タイルリストに必要なメモリを25%削減した。タイルロケーションリストは、最大タイル数*permutation数に等しいメモリを必要とします。8×8タイルは、高価なマテリアルパスの境界をより厳しくすることができます。私が8×8を選んだのは、permutation数がより限られているからでもあります。たとえば、フォリッジを含むタイルのパスを追加してみたり、default litしているタイルのパスを追加してみたり。
現在、10個のシェーダーパーミュテーションがあり、その結果、1080の8×8タイルで1.296MBのタイルロケーションバッファになります。ハーフ解像度タイルリストに過剰に割り当てなければ48kbを取り戻すことができるはずですが、メモリのほとんどはSSR+Reflection Applyに使用される8つのpermuationから来ています。
uint bAnySSSProfile = 0;

// loop over each 8x8 tile within the 16x16 pixel area
uint2 PixelOffsets[4] = { uint2(0, 0), uint2(1, 0), uint2(0, 1), uint2(1, 1) };
UNROLL
for(int i=0; i<4; ++i)
{
     uint2 PixelPos = (DispatchThreadId.xy * 2 + ViewDimensions.xy);
     FScreenSpaceData ScreenSpaceData = GetScreenSpaceDataUint(PixelPos + (PixelOffsets[i] * 8));
     FGBufferData InGBufferData = ScreenSpaceData.GBuffer;

     uint bIsDefaultLit = (InGBufferData.ShadingModelID == SHADINGMODELID_DEFAULT_LIT) ? 1 : 0;
     uint bIsFoliageLit = (InGBufferData.ShadingModelID == SHADINGMODELID_TWOSIDED_FOLIAGE) ? 1 : 0;
     uint bIsComplexLit = (InGBufferData.ShadingModelID > SHADINGMODELID_DEFAULT_LIT) ? 1 : 0;
     uint bIsSSSProfile = UseSubsurfaceProfile(InGBufferData.ShadingModelID) ? 1 : 0;

     float Roughness = InGBufferData.Roughness;
     float RoughnessFade = GetRoughnessFade(Roughness);
     uint bSkipSSR = (RoughnessFade <= 0.0 || InGBufferData.ShadingModelID == SHADIGNMODELID_UNLIT) && InGBufferData.ShadingModelID != SHADINGMODELID_CLEAR_COAT;

     // OR results
     uint MergedResult = (bIsSSSProfile << 2) | (bIsComplexList << 1) | bIsDefaultLit;
     MergedResult = WaveAllBitOr(MergedResult);
     uint bAnyDefaultLit = MergedResult & (1 << 0);
     uint bAnyComplexLit = MergedResult & (1 << 1);
     bAnySSSProfile = bAnySSSProfile | (MergedResult & (1 << 2));

     // AND result.
     MergedResult = (bSkipSSR << 2) | (bIsFoliageList << 1) | bIsDefaultLit;
     MergedResult = WaveAllBitAnd(MergedResult);
     uint bAllDefaultLit = MergedResult & (1 << 0);
     uint bAllFoliageLit = MergedResult & (1 << 1);
     uint bAllSkipSSR = MergedResult & (1 << 2);

     // select which permutation
     uint PermutationIndex = NUM_PREMUTATIONS;
     if (bAllFliageList)
     {
         PermutationIndex = 4;
     }
     else if (bAllDefaultLit)
     {
         PermutationIndex = 6;
     }
     else if (bAllComplexLit)
     {
         PermutationIndex = 0;
     }
     else if (bAnyDefaultLit)
     {
         PermutationIndex = 2;
     }

     // odd half of permutations lacks SSR completely
     if (bAllSkipSSR)
     {
         PermutationIndex += 1;
     }

     // write out the 8x8 data
     // first thread does atomic increment and write, fully unlit tiles are skipped entirely
     if (GroupIndex == 0 && PermutationIndex < NUM_PERMUTATIONS)
     {
         uint TileIndex;
         InterlockedAdd(RWTileDispatchCounts[PermutationIndex * 3], 1, TileIndex);

         uint TileLocationID = TileIndex + (PermutationIndex * NumTiles);
         uint2 TileLocation = (GroupId * 2) + PixelOffsets[i];
         RWTileLocationsBuffer[TileLocationID] = TileLocation.x | (TileLocation.y << 16);
     }

     // SSS permutations go beyond the end of the normal reflection tile permutations
     uint SSSPermutationIndex = NUM_PERMUATIONS + 1;
     if (bAnySSSProfile)
それは注目する価値があります – このシェーダの本当に素晴らしい点の1つは、GBufferプロパティをサンプリングするこれらの呼び出しがすべて1つのテクスチャ読み取りにマップされることです。Epicは便利なことに、すべての情報を1つのGBufferターゲットに既にパックしています。このターゲットには、ラフネスとマテリアルIDの両方が保持されています。
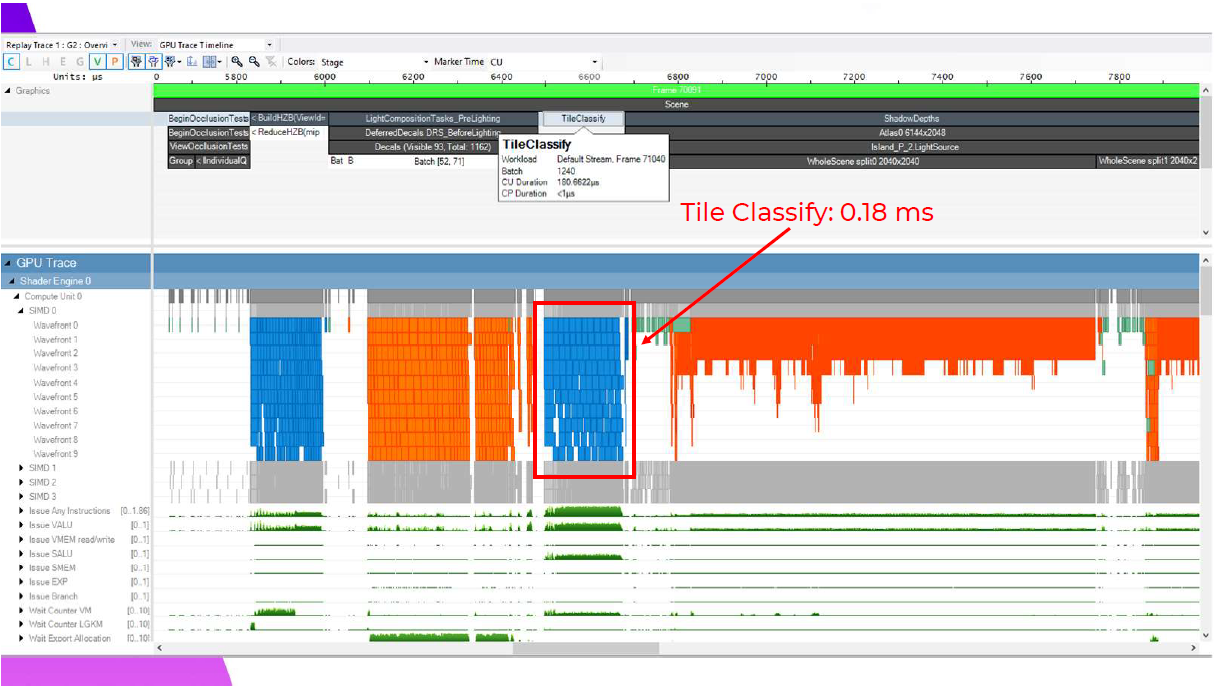
Razorに戻って、この分類シェーダーの実行コストを見てみましょう。ベースPS4で1080pの場合、0.18ミリ秒と控えめで、デカールがGBufferを変更し終わるとすぐに実行できます。
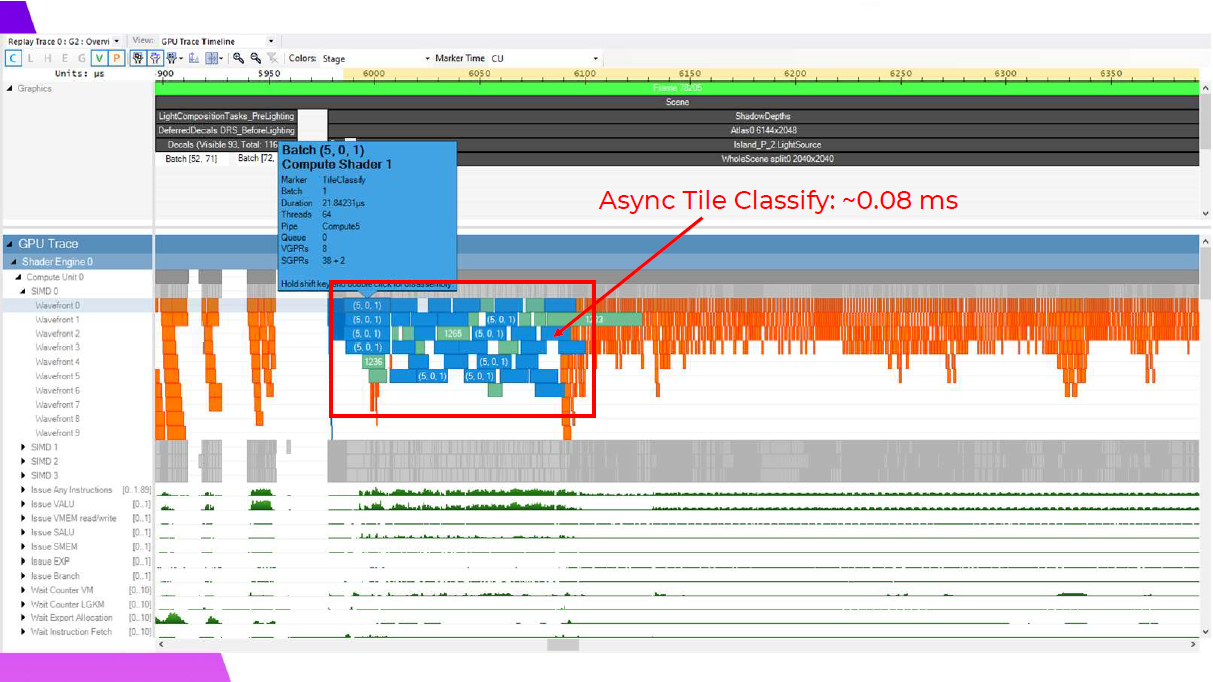
この分類処理は、非同期コンピュートを使用したシャドウ深度レンダリングと非常にうまく重なり、ここでは、マスクされたマテリアルのピクセルシェーダーウェイブが実行される前に、いくつかの頂点シェーディング処理と重なっているのがわかります。これはフレームに依存しますが、一般的に非同期で実行することでフレーム時間が約0.1ミリ秒短縮され、PS4では約0.08ミリ秒のコストになります。
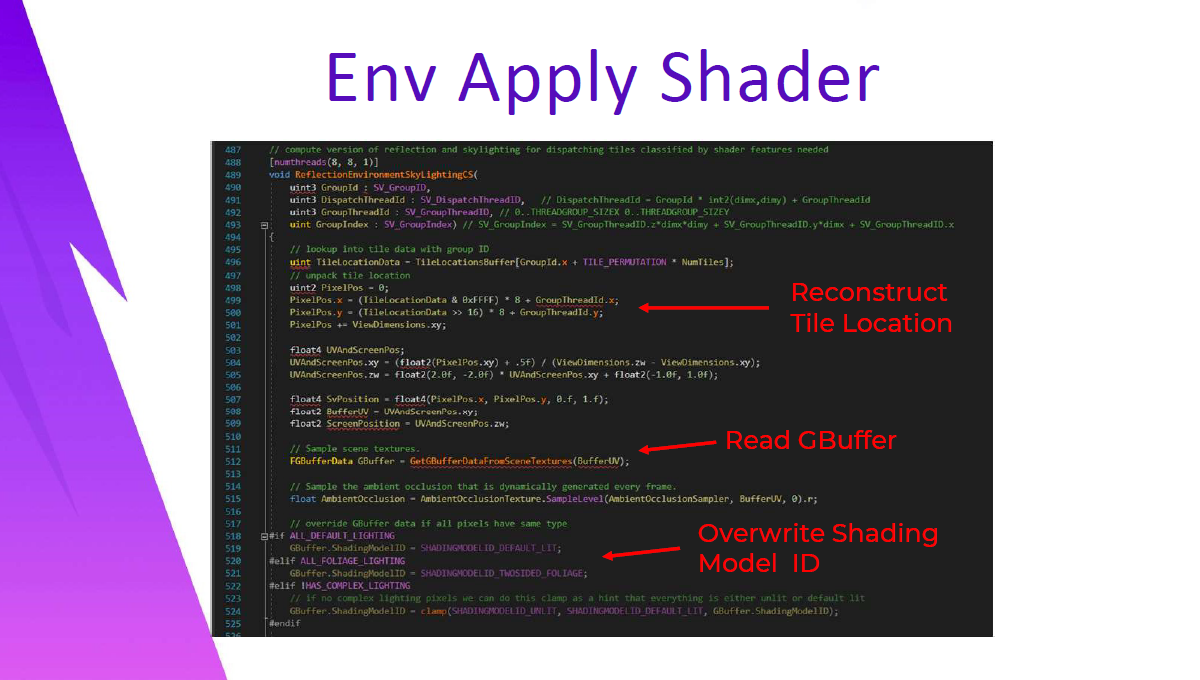
適用ステップのパフォーマンスを確認する前に、環境ライティングの適用に適用するコンピュートシェーダだけを見てみましょう。これは元の実装のフルスクリーンピクセルシェーディングパスにすぎず、このコンピュートシェーダーパスは、さまざまなshader permutationを持つDispatchIndirectの繰り返し呼び出しを使用して実行されます。
シェーダは、GroupIdを使用してタイルロケーションバッファを検索し、GroupThreadIdに基づいて個々のピクセル位置にアンパックすることによって始まります。GBuffer が読み込まれた後、ShadingModelID が上書きされることで、オプティマイザがshader permuationに基づいて定義されたプリプロセッサマクロに基づいてデッドコードの除去を実行することができます。
// compute version of reflection and skylighting for dispatching tiles classified by shader featuress needed
[numthreads(8, 8, 1)]
void ReflectionEnvironmentSkyLightingCS(
    uint3 GroupId : SV_GroupId,
    uint3 DispatchThreadId : SV_DispatchThreadID, // DispatchThreadId = GroupId * int2(dimx, dimy) + GroupThreadId
    uint3 GroupThreadId : SV_GroupThreadID, // 0 ... THREADGROUP_SIZEX 0... THREADGROUP_SIZEY
    uint GroupIndex : SV_GroupIndex) // SV_GroupIndex = SV_GroupThreadID.z * dimx * dimy + SV_GroupThreadID.y * dimx + SV_GroupThreadId.x
{
    // lookup into tile data with gorup ID
    uint TileLocationData = TileLocationBuffer[GroupId.x + TILE_PERMUTATION * NumTiles];
    // unpack tile location
    uint2 PixelPos = 0;
    PixelPos.x = (TileLocationData & 0xFFFF) * 8 + GroupThreadId.x;
    PixelPos.y = (TileLocationData >> 16) * 8 + GroupThreadId.y;
    PixelPos += ViewDimensions.xy;

    float3 UVAndScreenPos;
    UVAndScreenPos.xy = (float2(PixelPos.xy + .5f) / (ViewDimensions.zw - ViewDimensions.xy);
    UVAndScreenPos.zw = float2(2.0f, -2.0f) * UVANdScreenPos.xy + float2(-1.0f, 1.0f);

    float4 SvPosition = float2(PixelPos.x, PixelPos.y, 0.f, 1.f);
    float2 BufferUV = UVAndScreenPos.xy;
    float2 ScreenPosition = UVAndScreenPos.zw;

    // Sample scene textures.
    FGBufferData GBuffer = GetGBufferDataFromSceneTextures(BufferUV);

    // Sample the ambient occlusion that is dynamically generated every frame.
    float AmbientOcclusion = AmbientOcclusionTexture.SampleLevel(AmbientOcclusionSampler, BufferUV, 0).r;

    // override GBuffer Data if all pixels have same type
#if ALL_DEFAULT_LIGHTING
    GBuffer.ShadingModelID = SHADINGMODELID_DEFAULT_LIT;
#elif ALL_FOLIAGE_LIGHTING
    GBuffer.ShadingModelID = SHADINGMODELID_TWOSIDED_FOLIAGE+
#elif !HAS_COMPLEX_LIGHTING
    // if no complex lighting pixels we can do this clamp as a hint that everything is either unlit or default lit
    GBuffer.ShadingModelID = clamp(SHADINGMODELID_UNLIT, SHADINGMODELID_DEFAULT_LIT, GBuffer.ShadingModelID);
#endif
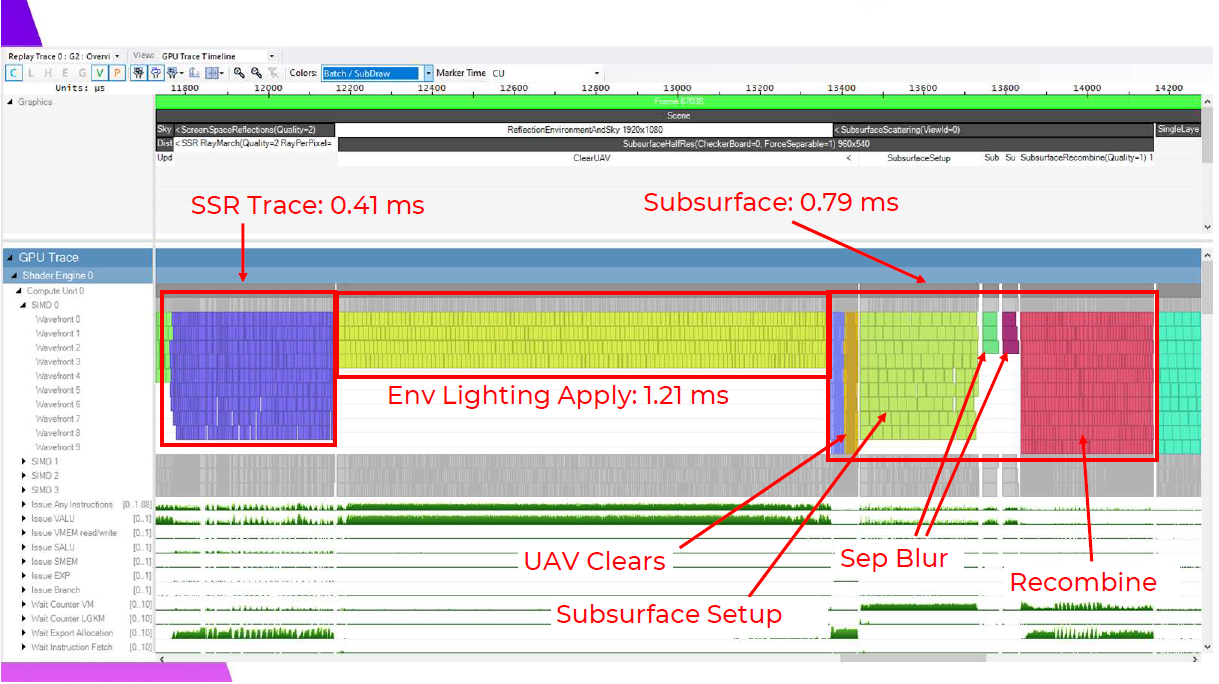
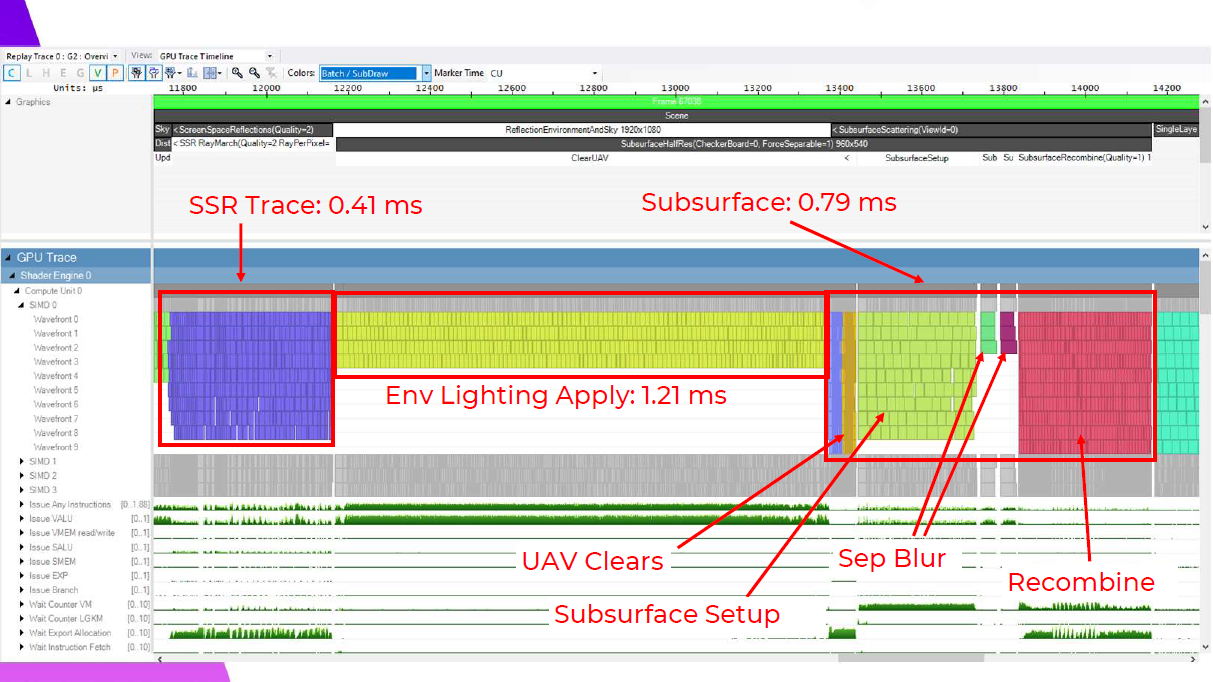
では、この0.08ミリ秒が、SSR、反射環境、SSSの適用において何を意味するのかを見ていく必要があります。これが、以前お見せしたシェーディングのオリジナルシーケンスです。
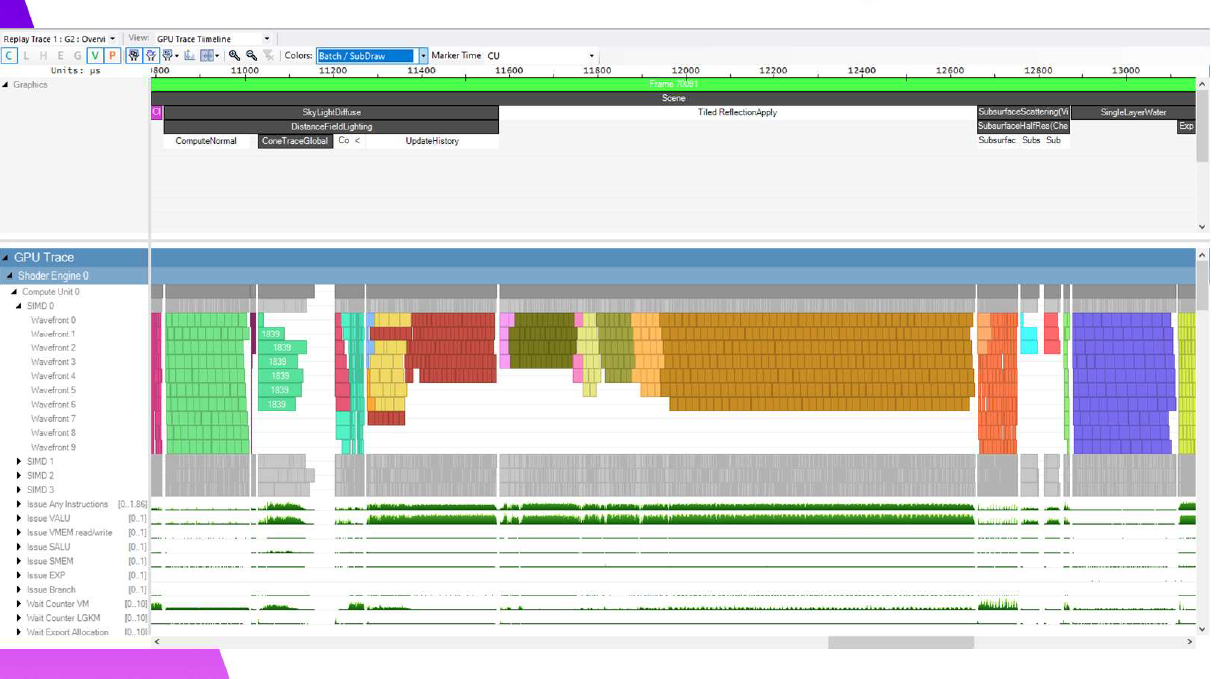
そして,これが我々の新しいフレームです。
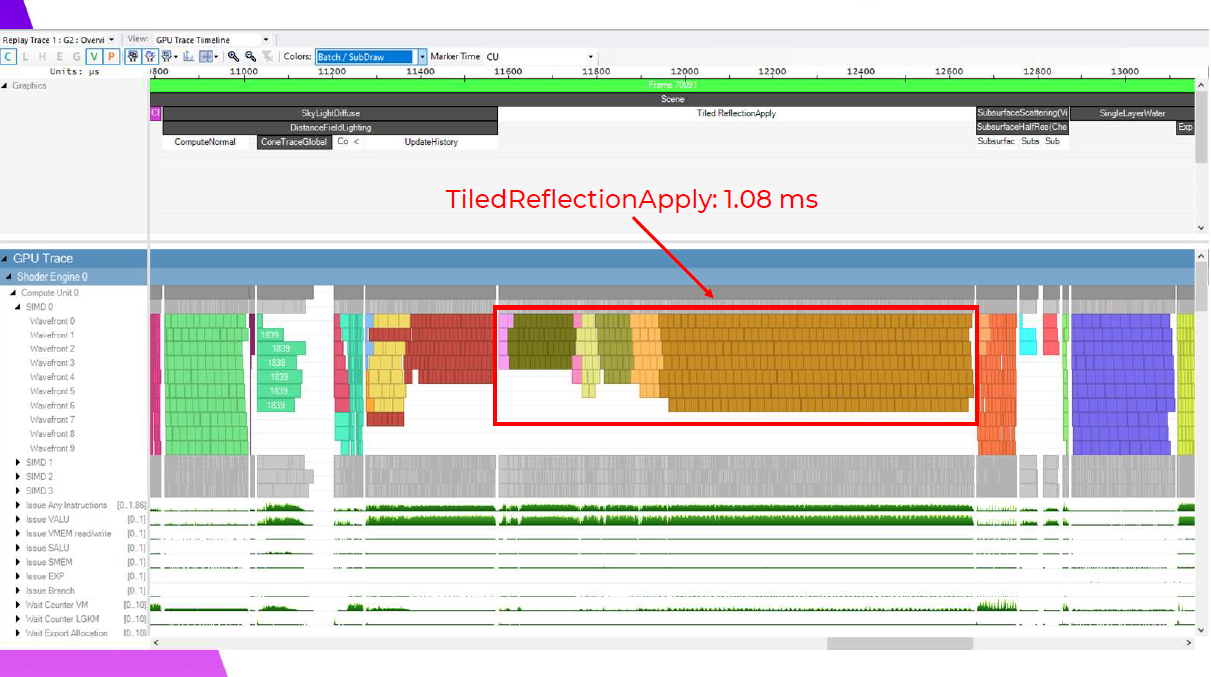
ここでは、Tiled Reflection適用シェーダーが1.08msで、0.13ms向上しています。このメリットの約半分は、このフレームでスカイピクセルをカリングしたことによるものなので、スカイピクセルのないフレームではあまり意味がありません。ここで私が指摘したい1つのマイクロ最適化は、最初のバリアの後に、占有率の低い遅いウェーブを最初に並べ、最後に最も速いウェーブを並べるということです。これは、占有率の低いウェーブが、より多くのレジスタが使用可能になるのを待っているためだと思います。また、稼働率の低いウェーブほど稼働時間が長くなる傾向があるため、最速のバッチを最後に置くことで、次のバリアまでに仕事がすぐになくなるようにしています。
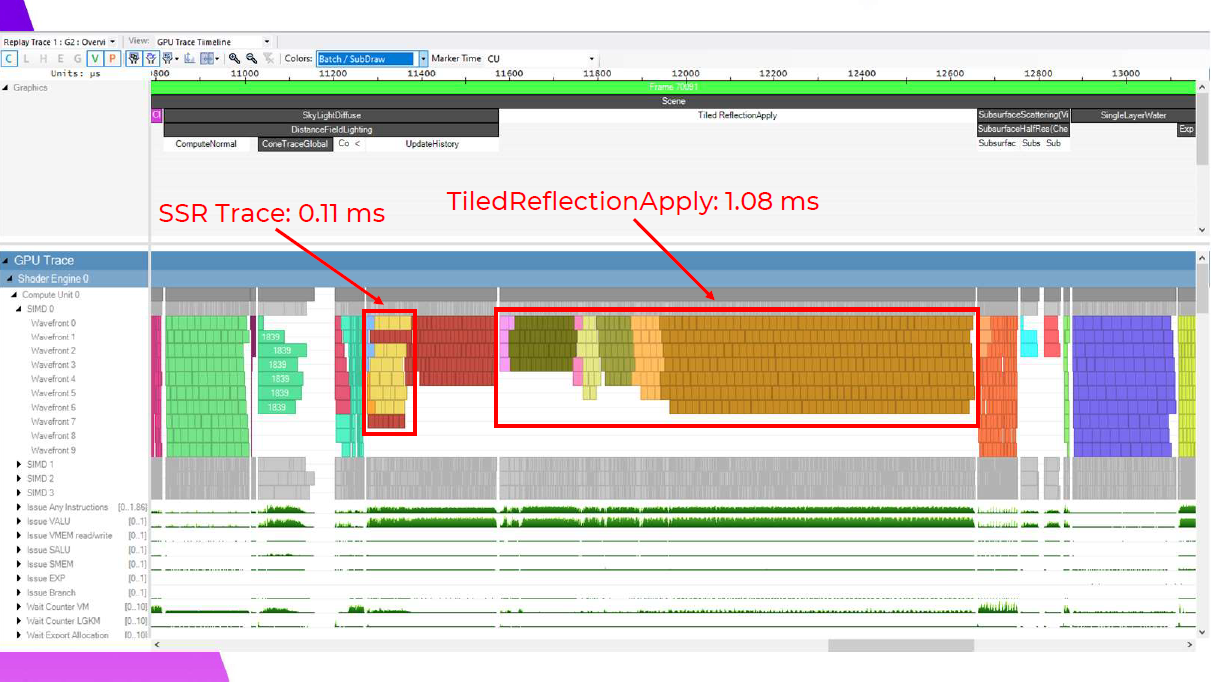
TiledReflectionの適用がわずかな利益を得ているのに対し、Screen Space Reflectionsは逆に実に大きな利益を得ています。0.3ms向上していますが、これはDFAOの履歴更新でウェーブがうまく重なっているためで、実際には控えめな改善です。これは、ウェーブがDFAOの履歴更新とうまく重なるようになったためです。これらは別々のバッファに書き込まれ、両方とも反射の適用に送られるため、バリアは必要ありません。SSRを使ったこれらの結果は、これが価値ある最適化になるという確信を最初に与えてくれました。
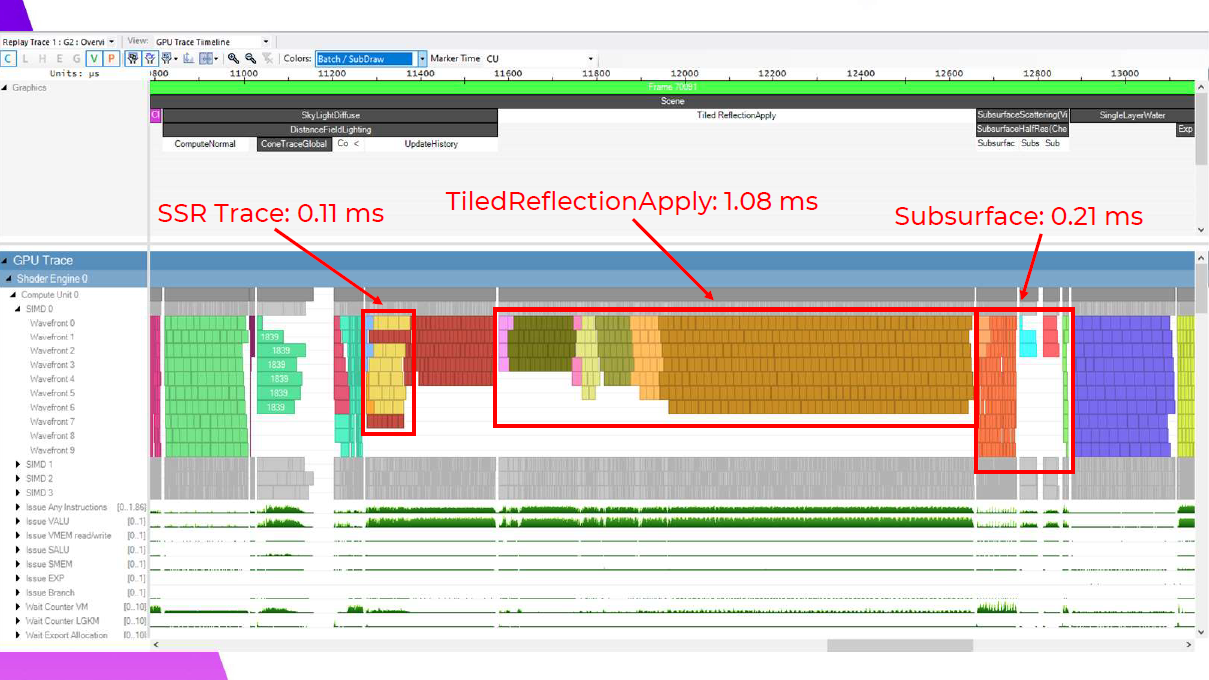
そして反射を適用した後のサブサーフェスも、0.58msと大幅に改善されています。
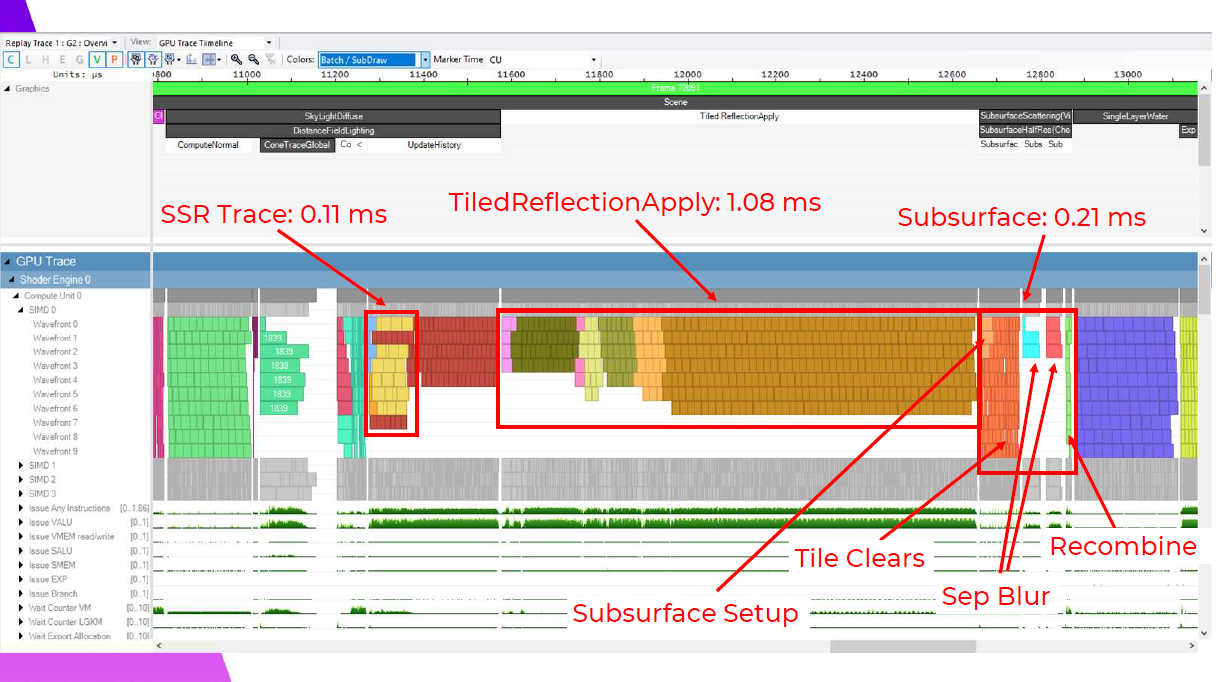
ここでは、セットアップとタイルクリアが実にきれいに重なり、タイルクリアはフルセットアップシェーダーよりもはるかに短いウェーブを持っているのがわかる。ブラーステップは純正のタイル分類化と同様で、スキンのあるタイルだけが実行されるため、再結合は非常に高速です。
さて、ここまで説明したところで……このパスが以前はどうだったのか、もう一度思い出しましょう。
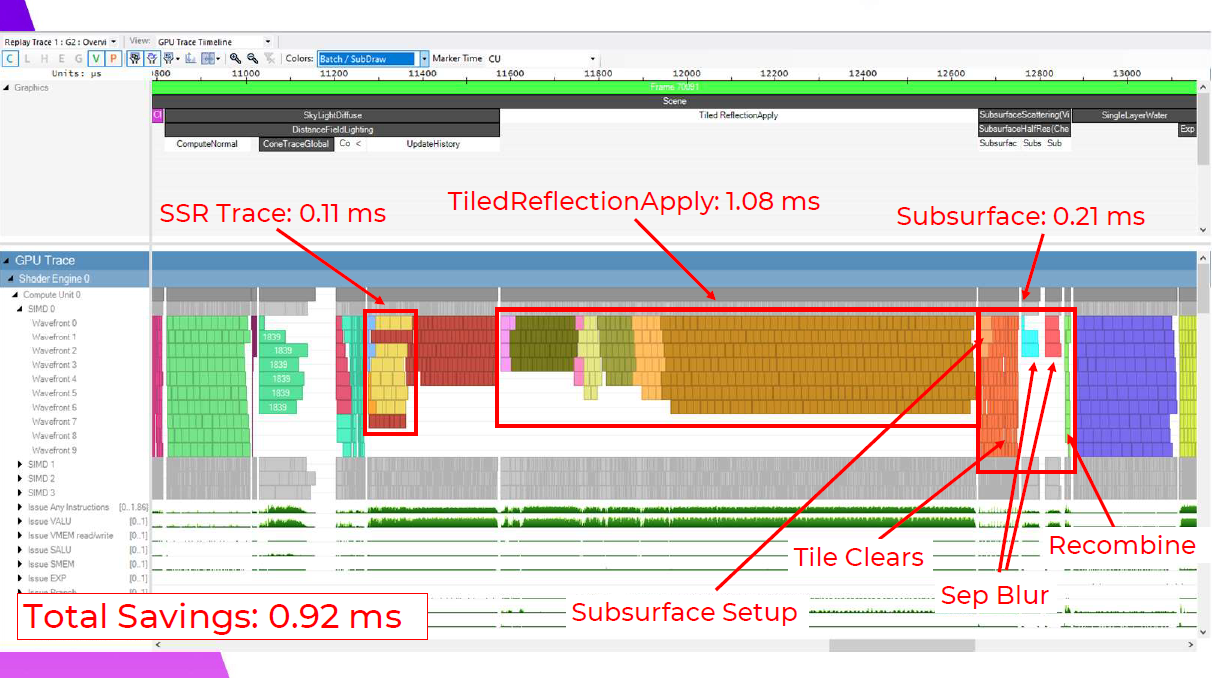
そして結果に戻りましょう。これらのパスにより、合計で~1msの節約になりますが、これらの利点はシーンの構図によって異なるため、分類コストを差し引くと、このショットでは合計0.92msになります。
おわりに
今回は,最適化ネタの一つしてタイル分類化の資料を紹介してみました。
ライティング・SSR・Subsurfaceあたりにも適用できるので,かなり最適化に効きそうです。実際にPS4で1ms程度の改善があるという実績があるのも良いですね。
最近だとUE5のNaniteによる描画とかでも使われていますよね。
実装自体は,Wave64モードにしてタイルサイズを8×8にしてWave組み込み命令を駆使するのが個人的には妥当な気がします。
次回は,実装方法について紹介できるといいなと思っています。
他にもいい資料をご存じの方は,是非コメント等でご紹介ください。