この記事はレイトレ合宿5!?のアドベントカレンダーの4週目の記事です。
こんにちわ,Pocolです。
皆さんレイを飛ばしていますか?
さて,昨年のレイトレ合宿ではビリという結果を残してしまったので,もう一度一から出直そうと思いました。…ということで,レイトレ再入門と題して,勉強し直してみようと思います。
レンダーターゲットの用意
まずは,描画先が必要になるのでレンダーターゲットを用意します。
HDRを表現できるように倍精度浮動小数型のVector3クラスを使いました。
    // レンダーターゲット生成.
    std::vector<Vector3> image;
    image.resize(width * height);
レンダーターゲットを作成したら,忘れずにクリアしておきます。
    // レンダーターゲットをクリア.
    for (size_t i = 0; i < image.size(); ++i)
    { image[i] = g_back_ground; }
今までは,自分でビットマップクラスを用意していたのですが,さすがにダルくなってきたので,
stb_image_writeを使いました。
ビットマップ出力は次のような感じです。
//-------------------------------------------------------------------------------------------------
//      BMPファイルに保存します.
//-------------------------------------------------------------------------------------------------
void save_to_bmp(const char* filename, int width, int height, const double* pixels)
{
    std::vector<uint8_t> images;
    images.resize(width * height * 3);

    const double inv_gamma = 1.0 / 2.2;

    for(auto i=0; i<width * height * 3; i+=3)
    {
        auto r = pow(pixels[i + 0], inv_gamma);
        auto g = pow(pixels[i + 1], inv_gamma);
        auto b = pow(pixels[i + 2], inv_gamma);

        r = saturate(r);
        g = saturate(g);
        b = saturate(b);

        images[i + 0] = static_cast<uint8_t>( r * 255.0 + 0.5 );
        images[i + 1] = static_cast<uint8_t>( g * 255.0 + 0.5 );
        images[i + 2] = static_cast<uint8_t>( b * 255.0 + 0.5 );
    }

    stbi_write_bmp(filename, width, height, 3, images.data());
}
シーンを用意する
次に簡単なシーンを用意します。球が最もやりやすいので,eduptと同じように大きな球を用意してコーネルボックスを表現します。
データは次の通りです。
const Sphere  g_spheres[] = {
    Sphere(1e5,     Vector3( 1e5 + 1.0,    40.8,          81.6), Vector3(0.25,  0.75,  0.25)),
    Sphere(1e5,     Vector3(-1e5 + 99.0,   40.8,          81.6), Vector3(0.25,  0.25,  0.75)),
    Sphere(1e5,     Vector3(50.0,          40.8,           1e5), Vector3(0.75,  0.75,  0.75)),
    Sphere(1e5,     Vector3(50.0,          40.8,  -1e5 + 170.0), Vector3()                  ),
    Sphere(1e5,     Vector3(50.0,           1e5,          81.6), Vector3(0.75,  0.75,  0.75)),
    Sphere(1e5,     Vector3(50.0,   -1e5 + 81.6,          81.6), Vector3(0.75,  0.75,  0.75)),
    Sphere(16.5,    Vector3(27.0,          16.5,          47.0), Vector3(0.75,  0.25,  0.25)),
    Sphere(16.5,    Vector3(73.0,          16.5,          78.0), Vector3(0.99,  0.99,  0.99))
};
上記で定義している球は次のようにコーディングしています。
///////////////////////////////////////////////////////////////////////////////////////////////////
// Sphere sturcture
///////////////////////////////////////////////////////////////////////////////////////////////////
struct Sphere
{
    double          radius;     //!< 半径です.
    Vector3         pos;        //!< 位置座標です.
    Vector3         color;      //!< 色です.

    Sphere
    (
        double          r,
        const Vector3&  p,
        const Vector3&  c
    )
    : radius    (r)
    , pos       (p)
    , color     (c)
    { /* DO_NOTHING*/ }

    inline double intersect(const Ray& ray) const
    {
        auto p = pos - ray.pos;
        auto b = dot(p, ray.dir);
        auto det = b * b - dot(p, p) + radius * radius;
        if (det >= 0.0)
        {
            auto sqrt_det = sqrt(det);
            auto t1 = b - sqrt_det;
            auto t2 = b + sqrt_det;
            if (t1 > D_HIT_MIN)
            { return t1; }
            else if (t2 > D_HIT_MIN)
            { return t2; }
        }

        return D_HIT_MAX;
    }
};
交差判定はintersect()メソッドで行い,実装は2次方程式の判別解\(\frac{D}{4}\)を用いて,当たったかどうかを計算しています。
ここまででシーンデータが準備出来ました。
レイを飛ばす
いよいよレイを飛ばします。レイはカメラから飛ばすので,最初にカメラクラスを実装しておきます。
///////////////////////////////////////////////////////////////////////////////////////////////////
// Camera class
///////////////////////////////////////////////////////////////////////////////////////////////////
class Camera
{
public:
    Camera
    (
        const Vector3&  position,
        const Vector3&  dir,
        const Vector3&  upward,
        double          fov,
        double          aspect,
        double          znear
    )
    {
        pos         = position;
        axis_x      = normalize(cross(dir, upward)) * fov * aspect;
        axis_y      = normalize(cross(dir, axis_x)) * fov;
        axis_z      = dir;
        near_clip   = znear;
    }

    inline Ray emit(double x, double y) const
    {
        auto d = axis_x * x + axis_y * y + axis_z;
        auto p = pos + d * near_clip;
        return Ray(p, normalize(d));
    }

private:
    Vector3 pos;        //!< 位置座標です.
    Vector3 axis_x;     //!< 基底ベクトル(X軸)
    Vector3 axis_y;     //!< 基底ベクトル(Y軸)
    Vector3 axis_z;     //!< 基底ベクトル(Z軸).
    double  near_clip;  //!< ニア平面までの距離.
};
やっていることはnear_clipをスクリーンの位置と見立てて,posを中心としたビュー空間を構成する基底ベクトルを求めます。
正規直交基底ベクトルを用いるのが普通なのですが,レイを飛ばすたびに同じ計算を行うと処理効率が悪いので,毎回同じ計算をする箇所は最初に1度計算してしまって,値を保存して使いまわすことにしています(axis_xとaxis_yのところが該当箇所です)。
ビュー空間を構成するベクトルが定まったら,emit()メソッドを使うことでレイを発射することができます。emit()メソッドでやっていることは,視点位置から,視線ベクトル方向に一旦移動し,xとyで指定されるスクリーン位置までaxis_xとaxis_yを使って移動します。このベクトルがレイを発射する方向となるので,正規化することでレイの方向ベクトルが定まります。レイの位置座標はカメラ位置から,方向ベクトルにnear_clip分だけ進んだところがスクリーンのヒット位置になります。この点を起点としてレイを発射します。
次に,レイと物体との交差判定を行います。すでにSphereクラスに交差判定用の処理があるので,これをシーンに配置されている球の数分for分で回して,一番交差距離が短いものを衝突物体として採用します。
//-------------------------------------------------------------------------------------------------
//      シーンとの交差判定を行います.
//-------------------------------------------------------------------------------------------------
inline bool intersect_scene(const Ray& ray, double* t, int* id)
{
    auto n = static_cast<int>(sizeof(g_spheres) / sizeof(g_spheres[0]));

    *t  = D_MAX;
    *id = -1;

    for (auto i = 0; i < n; ++i)
    {
        auto d = g_spheres[i].intersect(ray);
        if (d > D_HIT_MIN && d < *t)
        {
            *t  = d;
            *id = i;
        }
    }

    return (*t < D_HIT_MAX);
}
交差判定をして,ヒットしたら,そのピクセルに色を塗ります。
//-------------------------------------------------------------------------------------------------
//      交差物体の色を求めます.
//-------------------------------------------------------------------------------------------------
Vector3 shade(const Ray& ray)
{
    double t;
    int   id;

    // シーンとの交差判定.
    if (!intersect_scene(ray, &t, &id))
    { return g_back_ground; }

    // 交差物体の色を返却.
    return g_spheres[id].color;
}
これで,ヒット判定も実装できたので,レイを飛ばしてみます。
実装は次のようになります。
//-------------------------------------------------------------------------------------------------
//      メインエントリーポイントです.
//-------------------------------------------------------------------------------------------------
int main(int argc, char** argv)
{
    // レンダーターゲットのサイズ.
    int width  = 640;
    int height = 480;

    // カメラ用意.
    Camera camera(
        Vector3(50.0, 52.0, 295.6),                 // カメラ位置.
        normalize(Vector3(0.0, -0.042612, -1.0)),   // 視線ベクトル.
        Vector3(0.0, 1.0, 0.0),                     // 注視点.
        0.5135,                                     // 垂直画角(rad)
        double(width) / double(height),             // アスペクト比.
        130.0                                       // スクリーンまでの距離.
    );

    // レンダーターゲット生成.
    std::vector<Vector3> image;
    image.resize(width * height);

    // レンダーターゲットをクリア.
    for (size_t i = 0; i < image.size(); ++i)
    { image[i] = g_back_ground; }

    for (auto y = 0; y < height; ++y)
    {
        for (auto x = 0; x < width; ++x)
        {
            auto idx = y * width + x;
            auto fx = double(x) / double(width)  - 0.5;
            auto fy = double(y) / double(height) - 0.5;

            // Let's レイトレ!
            image[idx] += shade(camera.emit(fx, fy));
        }
    }

    // レンダーターゲットの内容をファイルに保存.
    save_to_bmp("image.bmp", width, height, &image.data()->x);

    // レンダーターゲットクリア.
    image.clear();

    return 0;
}
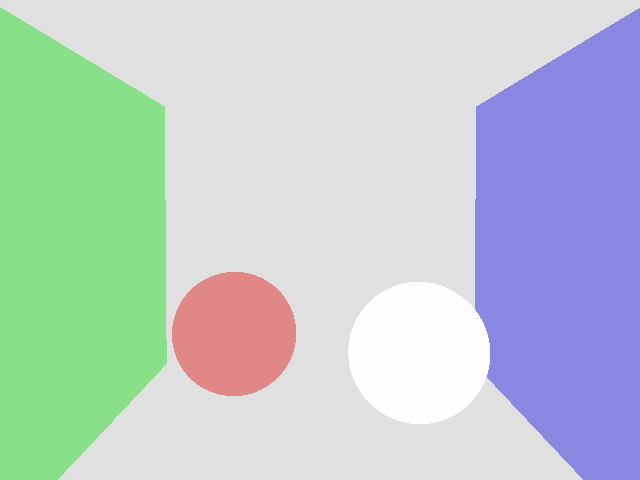
実装出来たら,実行してみましょう。
キチンとヒットしていれば下記のように色がつくはずです。
ここまでの,実装プログラムをGithubにアップロードしておきました。
https://github.com/ProjectAsura/sample_hit
これでレイが飛ばせるようになりました。
古典的レイトレーシング
続いて,古典的レイトレーシングを実装してみます。マテリアルの概念を導入し,マテリアルに沿って反射レイの飛ばし方を変えてみます。
まず,反射タイプを追加します。
///////////////////////////////////////////////////////////////////////////////////////////////////
// ReflectionType enum
///////////////////////////////////////////////////////////////////////////////////////////////////
enum ReflectionType
{
    Diffuse             = 0,    //!< 完全拡散反射.
    PerfectSpecular     = 1,    //!< 完全鏡面反射.
    Refraction          = 2,    //!< 屈折.
};
反射タイプを追加したら,shade()メソッドをradiance()メソッドにリネームして,下記のような実装を行います。
//-------------------------------------------------------------------------------------------------
//      放射輝度を求めます.
//-------------------------------------------------------------------------------------------------
Vector3 radiance(const Ray& ray, int depth)
{
    double t;
    int   id;

    // シーンとの交差判定.
    if (!intersect_scene(ray, &t, &id))
    { return g_back_ground; }

    // 交差物体.
    const auto& obj = g_spheres[id];

    // 交差位置.
    const auto hit_pos = ray.pos + ray.dir * t;

    // 法線ベクトル.
    const auto normal  = normalize(hit_pos - obj.pos);

    // 物体からのレイの入出を考慮した法線ベクトル.
    const auto orienting_normal = (dot(normal, ray.dir) < 0.0) ? normal : -normal;

    // 打ち切り深度に達したら終わり.
    if(depth > g_max_depth)
    { return g_back_ground; }

    switch (obj.type)
    {
    case ReflectionType::Diffuse:
        {
            double t_;
            int    id_;

            // ライトベクトル.
            auto light_dir  = g_light_pos - hit_pos;

            // ライトまでの距離.
            auto light_dist = length(light_dir);

            // ライトベクトルを正規化.
            light_dir /= light_dist;

            // ライトとの間に遮蔽物がないことを確認.
            intersect_scene(Ray(hit_pos, light_dir), &t_, &id_);

            // 遮蔽物がない場合.
            if (t_ >= light_dist)
            {
                auto diffuse = obj.color * max(dot(orienting_normal, light_dir), 0.0) / (light_dist * light_dist);
                return g_light_color * diffuse;
            }
            else
            {
                // 遮蔽物がある.
                return g_shadow_color;
            }
        }
        break;

    case ReflectionType::PerfectSpecular:
        {
            // 反射させる.
            return obj.color * radiance(Ray(hit_pos, reflect(ray.dir, normal)), depth + 1);
        }
        break;

    case ReflectionType::Refraction:
        {
            // 反射レイ
            auto reflect_ray = Ray(hit_pos, reflect(ray.dir, normal));

            // 内部侵入するか?
            auto into = dot(normal, orienting_normal) > 0.0;

            // 空気の屈折率
            const auto nc = 1.0;

            // 物体の屈折率
            const auto nt = 1.5;

            // Snellの法則.
            const auto nnt = (into) ? (nc / nt) : (nt / nc);
            const auto vn  = dot(ray.dir, orienting_normal);
            const auto cos2t = 1.0 - nnt * nnt * (1.0 - vn * vn);

            // 全反射かどうかチェック.
            if (cos2t < 0.0)
            { return obj.color * radiance(reflect_ray, depth + 1); }

            // 屈折ベクトル.
            auto refract = normalize(ray.dir * nnt - normal * ((into) ? 1.0 : -1.0) * (vn * nnt + sqrt(cos2t)) );

            // Schlickによる Fresnel の反射係数の近似.
            const auto a  = nt - nc;
            const auto b  = nt + nc;
            const auto R0 = (a * a) / (b * b);

            const auto c  = 1.0 - ((into) ? -vn : dot(refract, normal));
            const auto Re = R0 + (1.0 - R0) * pow(c, 5.0);

            const auto nnt2 = pow((into) ? (nc / nt) : (nt /nc), 2.0);
            const auto Tr = (1.0 - Re) * nnt2;
            const auto p  = 0.25 + 0.5 * Re;

            // 屈性レイ
            Ray refract_ray(hit_pos, refract);

            const auto reflect_result = radiance(reflect_ray, depth + 1) * Re;
            const auto refract_result = radiance(refract_ray, depth + 1) * Tr;

            return obj.color * (reflect_result + refract_result);
        }
        break;
    }

    // どれにもヒットしなかった.
    return g_back_ground;
}
リアルタイムレンダリングのようにLambertのBRDFを計算しているのと,反射・屈折の処理が追加されています。
反射・屈折処理についてはeduptとほぼ同じなので説明はeduptのスライドを参照してください。
名前をradiance()に変えたのでmain()関数側も忘れずに修正しておきます。
    for (auto y = 0; y < height; ++y)
    {
        for (auto x = 0; x < width; ++x)
        {
            auto idx = y * width + x;
            auto fx = double(x) / double(width)  - 0.5;
            auto fy = double(y) / double(height) - 0.5;

            // Let's レイトレ!
            image[idx] += radiance(camera.emit(fx, fy), 0);
        }
    }
修正したら実行してみます。
きちんと実装されていれば次のようになるはずです。
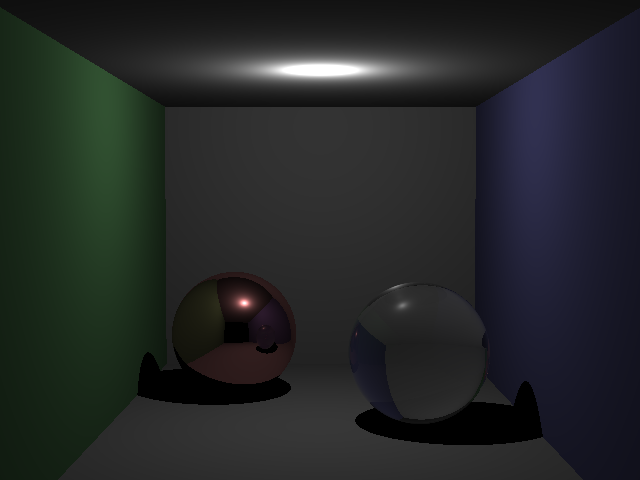
この程度の処理なら,現代的なPCを使っていれば1秒かからないうちに終わります。
ここまでのサンプルプログラムをGithubにアップロードしておきました。
https://github.com/ProjectAsura/sample_rt
Path Tracing
さて,続いてパストレです。radiance()メソッドでは,ここまで再帰を使っていましたが,あんまり呼び出すとスタックオーバーフローになる可能性があるので,再帰を使わずにループ文に書き直します。実装は次のような感じです。
//-------------------------------------------------------------------------------------------------
//      放射輝度を求めます.
//-------------------------------------------------------------------------------------------------
Vector3 radiance(const Ray& input_ray, int depth, Random* random)
{
    Vector3 L(0, 0, 0);
    Vector3 W(1, 1, 1);
    Ray ray(input_ray.pos, input_ray.dir);

    while(true)
    {
        double t;
        int   id;

        // シーンとの交差判定.
        if (!intersect_scene(ray, &t, &id))
        { break; }

        // 交差物体.
        const auto& obj = g_spheres[id];

        // 交差位置.
        const auto hit_pos = ray.pos + ray.dir * t;

        // 法線ベクトル.
        const auto normal  = normalize(hit_pos - obj.pos);

        // 物体からのレイの入出を考慮した法線ベクトル.
        const auto orienting_normal = (dot(normal, ray.dir) < 0.0) ? normal : -normal;

        auto p = max(obj.color.x, max(obj.color.y, obj.color.z));

        L += W * obj.emission;

        // 打ち切り深度に達したら終わり.
        if(depth > g_max_depth)
        {
            if (random->get_as_double() >= p)
            { break; }
        }
        else
        {
            p = 1.0;
        }

        switch (obj.type)
        {
        case ReflectionType::Diffuse:
            {
                // 基底ベクトル.
                Vector3 u, v, w;

                w = orienting_normal;
                if (abs(w.x) > 0.1)
                { u = normalize(cross(Vector3(0, 1, 0), w)); }
                else
                { u = normalize(cross(Vector3(1, 0, 0), w)); }
                v = cross(w, u);

                const auto r1 = D_2PI * random->get_as_double();
                const auto r2 = random->get_as_double();
                const auto r2s = sqrt(r2);

                auto dir = normalize(u * cos(r1) * r2s + v * sin(r1) * r2s + w * sqrt(1.0 - r2));

                ray = Ray(hit_pos, dir);
                W *= (obj.color / p);
            }
            break;

        case ReflectionType::PerfectSpecular:
            {
                ray = Ray(hit_pos, reflect(ray.dir, normal));
                W *= (obj.color / p);
            }
            break;

        case ReflectionType::Refraction:
            {
                Ray reflect_ray = Ray(hit_pos, reflect(ray.dir, normal));
                auto into = dot(normal, orienting_normal) > 0.0;

                const auto nc = 1.0;
                const auto nt = 1.5;
                const auto nnt = (into) ? (nc / nt) : (nt / nc);
                const auto ddn = dot(ray.dir, orienting_normal);
                const auto cos2t = 1.0 - nnt * nnt * (1.0 - ddn * ddn);

                if (cos2t < 0.0)
                {
                    ray = reflect_ray;
                    W *= (obj.color / p);
                    break;
                }

                auto dir = normalize(ray.dir * nnt - normal * ((into) ? 1.0 : -1.0) * (ddn * nnt + sqrt(cos2t)));

                const auto a = nt - nc;
                const auto b = nt + nc;
                const auto R0 = (a * a) / (b * b);
                const auto c = 1.0 - ((into) ? -ddn : dot(dir, normal));
                const auto Re = R0 + (1.0 - R0) * pow(c, 5.0);
                const auto Tr = 1.0 - Re;
                const auto prob = 0.25 + 0.5 * Re;

                if (random->get_as_double() < prob)
                {
                    ray = reflect_ray;
                    W *= (obj.color * Re / prob) / p;
                }
                else
                {
                    ray = Ray(hit_pos, dir);
                    W *= (obj.color * Tr / (1.0 - prob)) / p;
                }
            }
            break;
        }

        depth++;
    }

    return L;
}
次に,複数サンプルとれるようにmain()関数内の処理を次のように変更します。
//-------------------------------------------------------------------------------------------------
//      メインエントリーポイントです.
//-------------------------------------------------------------------------------------------------
int main(int argc, char** argv)
{
    // レンダーターゲットのサイズ.
    int width   = 640;
    int height  = 480;
    int samples = 512;

    // カメラ用意.
    Camera camera(
        Vector3(50.0, 52.0, 295.6),
        normalize(Vector3(0.0, -0.042612, -1.0)),
        Vector3(0.0, 1.0, 0.0),
        0.5135,
        double(width) / double(height),
        130.0
    );

    // レンダーターゲット生成.
    std::vector<Vector3> image;
    image.resize(width * height);

    Random random(123456);

    // レンダーターゲットをクリア.
    for (size_t i = 0; i < image.size(); ++i)
    { image[i] = g_back_ground; }

    for(auto s = 0; s < samples; ++s)
    {
        printf_s("%.2lf%% complete\r", (double(s)/double(samples) * 100.0));

        for (auto y = 0; y < height; ++y)
        {
            for (auto x = 0; x < width; ++x)
            {
                auto idx = y * width + x;

                auto fx = double(x) / double(width)  - 0.5;
                auto fy = double(y) / double(height) - 0.5;

                // Let's レイトレ!
                image[idx] += radiance(camera.emit(fx, fy), 0, &random) / samples;
            }
        }
    }

    // レンダーターゲットの内容をファイルに保存.
    save_to_bmp("image.bmp", width, height, &image.data()->x);

    // レンダーターゲットクリア.
    image.clear();

    return 0;
}
見ると分かるように,乱数が導入されているのと,サンプル数分ループする処理が追加されています。
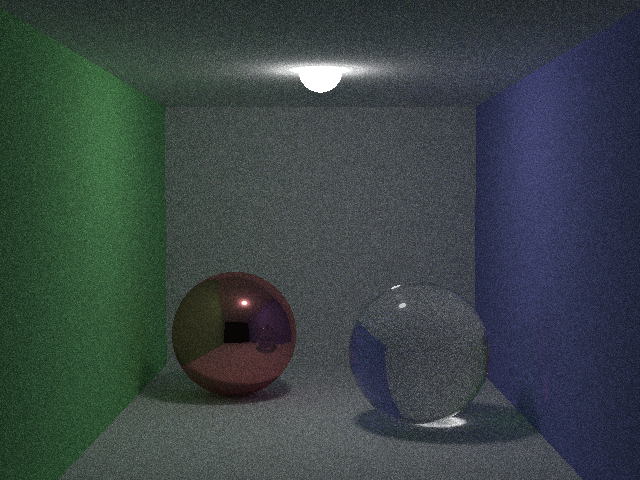
このプログラムを実行すると次のような結果が得られます。
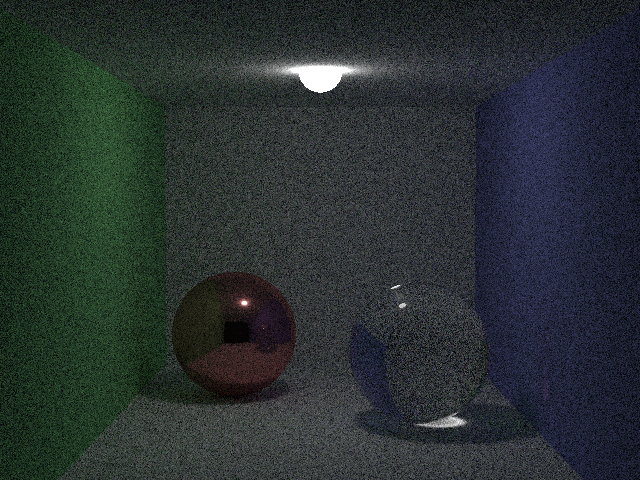
サンプル数が少ないため,ノイジーですが,ガラス玉付近に集光現象が見られたり,柔らかい影が表現されていたりなど,ライティング結果の向上が見て取れます。
ここまでのプログラムをGithubにアップロードしておきました。
https://github.com/ProjectAsura/sample_pt
これでパストレーシングも実装しました。
Next Event Estimation
次に速度向上のために直接光ライティングを導入してみます。
Next Event EstimationについてはSchokerさんが詳しく説明されています。Schokerさんのページを参照しましょう。
http://rayspace.xyz/CG/contents/path_tracing_implementation/
物体と衝突したら,光源方向にシャドウレイを飛ばします。シャドウレイを飛ばした結果,ライト以外の遮蔽物と交差していなければライトの寄与が取れます。遮蔽されている場合は何もしません。今回のサンプルではライトが一つなので,1つのライトを選択して,乱数により適当なライト表面上の位置を決定します。この点に向かってシャドウレイを飛ばして,交差判定を行います。遮蔽が無い場合は,BRDFと,G項とライトの確率密度関数から寄与を計算します。G項については下記のスライドに記載があります。
このNext Event Estimationの処理をDiffuse計算の先頭に追加します。
        case ReflectionType::Diffuse:
            {
                #if 1
                // Next Event Estimation
                {
                    const auto& light = g_spheres[g_lightId];

                    const auto r1 = D_2PI * random->get_as_double();
                    const auto r2 = 1.0 - 2.0 * random->get_as_double();
                    const auto light_pos = light.pos + (light.radius + D_HIT_MIN) * Vector3(sqrt(1.0 - r2 * r2) * cos(r1), sqrt(1.0 - r2 * r2) * sin(r1), r2);

                    // ライトベクトル.
                    auto light_dir   = light_pos - hit_pos;

                    // ライトへの距離の2乗
                    auto light_dist2 = dot(light_dir, light_dir);

                    // 正規化.
                    light_dir = normalize(light_dir);

                    // ライトの法線ベクトル.
                    auto light_normal = normalize(light_pos - light.pos);

                    auto dot0 = dot(orienting_normal, light_dir);
                    auto dot1 = dot(light_normal, -light_dir);
                    auto rad2 = light.radius * light.radius;

                    // 寄与が取れる場合.
                    if (dot0 >= 0 && dot1 >= 0 && light_dist2 >= rad2)
                    {
                        double shadow_t;
                        int    shadow_id;
                        Ray    shadow_ray(hit_pos, light_dir);

                        // シャドウレイを発射.
                        auto hit = intersect_scene(shadow_ray, &shadow_t, &shadow_id);

                        // ライトのみと衝突した場合のみ寄与を取る.
                        if (hit && shadow_id == g_lightId)
                        {
                            auto G = dot0 * dot1 / light_dist2;
                            auto pdf = 1.0 / (4.0 * D_PI * rad2);

                            L += W * light.emission * (obj.color / D_PI) * G / pdf;
                        }
                    }
                }
                #endif
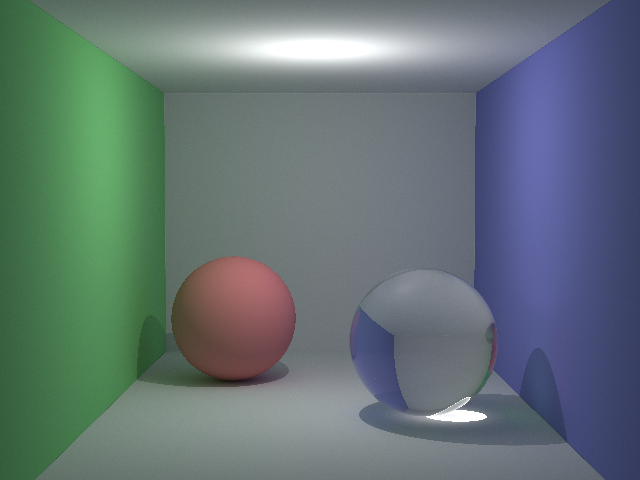
この追加を加えたプログラムを実行すると,次のような結果が得られました。
Next Event Estimationが入っていないプログラムに比べると良くなっているのが見て取れます。
ここまでのプログラムをGithubにアップロードしておきました。
https://github.com/ProjectAsura/sample_pt2
若干,プログラムが怪しいですが…
一応Next Event Estimationが実装できたということにしておきたいと思います。