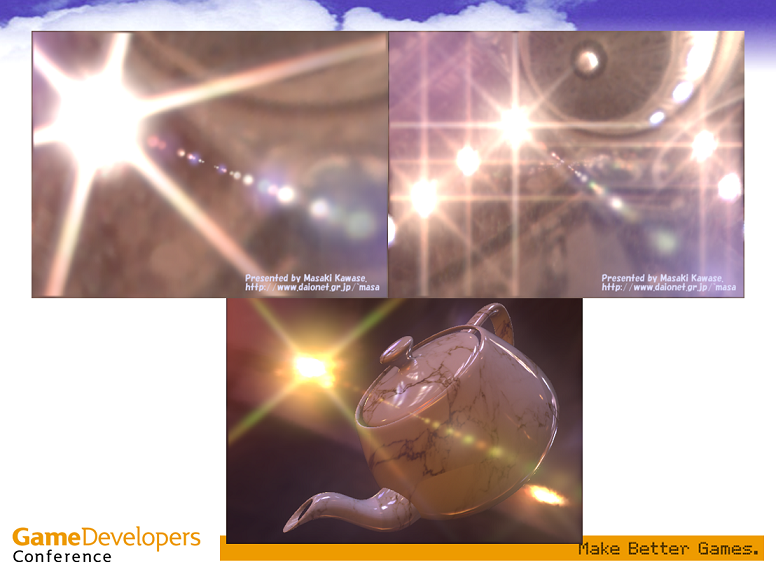
前回に引き続き川瀬式グレアエフェクトを勉強してみようと思います。
今回は,レンズゴーストを実装してみます。



00386: //---------------------------------------------------------------------------------------
00387: // 描画時の処理です.
00388: //---------------------------------------------------------------------------------------
00389: void SampleApplication::OnFrameRender( double time, double elapsedTime )
00390: {
00391: auto w = m_Width;
00392: auto h = m_Height;
00393:
00394: ID3D11ShaderResourceView* pSrc = nullptr;
00395: ID3D11RenderTargetView* pDst = nullptr;
00396:
00397: auto pMask = m_MaskTexture.GetSRV();
00398:
00399: ID3D11ShaderResourceView* nullSRVs[2] = { nullptr, nullptr };
00400:
00401: UINT sampleMask = D3D11_DEFAULT_SAMPLE_MASK;
00402: float blendFactor[4] = { 1.0f, 1.0f, 1.0f, 1.0f };
00403: float clearColor[4] = { 0.0f, 0.0f, 0.0f, 1.0f };
00404: auto deviation = 5.0f;
00405:
00406: // 入力画像にガウスブラーを掛ける,
00407: {
00408: pDst = m_WorkBuffer[2].GetRTV();
00409: pSrc = m_InputTexture.GetSRV();
00410:
00411: // クリア処理.
00412: m_pDeviceContext->ClearRenderTargetView( pDst, m_ClearColor );
00413:
00414: // 出力マネージャに設定.
00415: m_pDeviceContext->OMSetRenderTargets( 1, &pDst, nullptr );
00416:
00417: // ステートを設定.
00418: m_pDeviceContext->RSSetState( m_pRasterizerState );
00419: m_pDeviceContext->OMSetBlendState( m_pOpequeBS, blendFactor, sampleMask );
00420: m_pDeviceContext->OMSetDepthStencilState( m_pDepthStencilState, m_StencilRef );
00421:
00422: // シェーダの設定.
00423: m_pDeviceContext->VSSetShader( m_pFullScreenVS, nullptr, 0 );
00424: m_pDeviceContext->GSSetShader( nullptr, nullptr, 0 );
00425: m_pDeviceContext->HSSetShader( nullptr, nullptr, 0 );
00426: m_pDeviceContext->DSSetShader( nullptr, nullptr, 0 );
00427: m_pDeviceContext->PSSetShader( m_pGaussBlurPS, nullptr, 0 );
00428:
00429: // シェーダリソースビューを設定.
00430: m_pDeviceContext->PSSetShaderResources( 0, 1, &pSrc );
00431: m_pDeviceContext->PSSetSamplers( 0, 1, &m_pLinearClamp );
00432:
00433:
00434: D3D11_VIEWPORT viewport;
00435: viewport.TopLeftX = 0;
00436: viewport.TopLeftY = 0;
00437: viewport.Width = float(w) / 4.0f;
00438: viewport.Height = float(h) / 4.0f;
00439: viewport.MinDepth = 0.0f;
00440: viewport.MaxDepth = 1.0f;
00441:
00442: m_pDeviceContext->RSSetViewports( 1, &viewport );
00443:
00444: auto pCB = m_GaussBlurBuffer.GetBuffer();
00445: GaussBlurParam src = CalcBlurParam(w, h, asdx::Vector2(1.0f, 0.0f), deviation);
00446: m_pDeviceContext->UpdateSubresource( pCB, 0, nullptr, &src, 0, 0 );
00447: m_pDeviceContext->PSSetConstantBuffers( 0, 1, &pCB );
00448:
00449: // 描画.
00450: m_Quad.Draw(m_pDeviceContext);
00451:
00452: pSrc = m_WorkBuffer[2].GetSRV();
00453: pDst = m_WorkBuffer[3].GetRTV();
00454:
00455: // クリア処理.
00456: m_pDeviceContext->ClearRenderTargetView( pDst, m_ClearColor );
00457:
00458: // 出力マネージャに設定.
00459: m_pDeviceContext->OMSetRenderTargets( 1, &pDst, nullptr );
00460:
00461: // シェーダリソースビューを設定.
00462: m_pDeviceContext->PSSetShaderResources( 0, 1, &pSrc );
00463: m_pDeviceContext->PSSetSamplers( 0, 1, &m_pLinearClamp );
00464:
00465: src = CalcBlurParam(w, h, asdx::Vector2(0.0f, 1.0f), deviation);
00466: m_pDeviceContext->UpdateSubresource( pCB, 0, nullptr, &src, 0, 0 );
00467: m_pDeviceContext->PSSetConstantBuffers( 0, 1, &pCB );
00468:
00469: // ステートを設定.
00470: m_pDeviceContext->RSSetState( m_pRasterizerState );
00471: m_pDeviceContext->OMSetBlendState( m_pOpequeBS, blendFactor, sampleMask );
00472: m_pDeviceContext->OMSetDepthStencilState( m_pDepthStencilState, m_StencilRef );
00473:
00474: // 描画.
00475: m_Quad.Draw(m_pDeviceContext);
00476:
00477: // シェーダリソースをクリア.
00478: ID3D11ShaderResourceView* nullTarget[1] = { nullptr };
00479: m_pDeviceContext->PSSetShaderResources( 0, 1, nullTarget );
00480: }
00481:
00482: // ゴーストを生成
00483: {
00484: // 乗算カラー / テクスチャスケール.
00485: asdx::Vector4 colors[] = {
00486: asdx::Vector4(1.0f, 0.5f, 0.6f, -1.2f),
00487: asdx::Vector4(0.3f, 1.0f, 0.6f, -1.2f),
00488: asdx::Vector4(0.6f, 0.35f, 1.0f, -1.5f),
00489: asdx::Vector4(1.0f, 0.6f, 0.3f, -1.75f),
00490: asdx::Vector4(0.25f, 1.0f, 0.7f, 1.2f),
00491: asdx::Vector4(0.5f, 0.9f, 1.0f, 1.35f),
00492: asdx::Vector4(0.3f, 1.0f, 0.5f, 1.5f),
00493: asdx::Vector4(0.7f, 0.5f, 1.0f, 2.0f),
00494: };
00495:
00496: pSrc = m_WorkBuffer[3].GetSRV();
00497: pDst = m_WorkBuffer[0].GetRTV();
00498:
00499: auto pCB = m_LensGhostBuffer.GetBuffer();
00500:
00501: // レンダーターゲット設定.
00502: m_pDeviceContext->ClearRenderTargetView( pDst, clearColor );
00503: m_pDeviceContext->OMSetRenderTargets( 1, &pDst, nullptr );
00504:
00505: // ブレンドステート設定.
00506: m_pDeviceContext->OMSetBlendState( m_pAdditiveBS, blendFactor, sampleMask );
00507:
00508: D3D11_VIEWPORT viewport;
00509: viewport.TopLeftX = 0;
00510: viewport.TopLeftY = 0;
00511: viewport.Width = float(w);
00512: viewport.Height = float(h);
00513: viewport.MinDepth = 0.0f;
00514: viewport.MaxDepth = 1.0f;
00515:
00516: m_pDeviceContext->RSSetViewports( 1, &viewport );
00517:
00518: // シェーダの設定.
00519: m_pDeviceContext->VSSetShader( m_pFullScreenVS, nullptr, 0 );
00520: m_pDeviceContext->GSSetShader( nullptr, nullptr, 0 );
00521: m_pDeviceContext->HSSetShader( nullptr, nullptr, 0 );
00522: m_pDeviceContext->DSSetShader( nullptr, nullptr, 0 );
00523: m_pDeviceContext->PSSetShader( m_pLensGhostPS, nullptr, 0 );
00524:
00525: m_pDeviceContext->PSSetShaderResources( 0, 1, &pSrc );
00526: m_pDeviceContext->PSSetShaderResources( 1, 1, &pMask );
00527: m_pDeviceContext->PSSetSamplers( 0, 1, &m_pLinearClamp );
00528:
00529: // ゴーストを描画.
00530: for(auto i=0; i<8;++i)
00531: {
00532: LensGhostParam param;
00533: param.MultiplyColor = colors[i];
00534:
00535: // 定数バッファ更新.
00536: m_pDeviceContext->UpdateSubresource( pCB, 0, nullptr, ¶m, 0, 0 );
00537:
00538: // 定数バッファ設定.
00539: m_pDeviceContext->PSSetConstantBuffers( 0, 1, &pCB );
00540:
00541: // 矩形描画.
00542: m_Quad.Draw(m_pDeviceContext);
00543: }
00544:
00545: // リソースを解除.
00546: m_pDeviceContext->PSSetShaderResources( 0, 2, nullSRVs );
00547: }
00548:
00549: // WorkBuffer[0]を元にゴーストを生成.
00550: {
00551: // 乗算カラー / テクスチャスケール.
00552: asdx::Vector4 colors[] = {
00553: asdx::Vector4(0.1f, 0.7f, 1.0f, 1.0f),
00554: asdx::Vector4(1.0f, 0.3f, 0.6f, 2.5f),
00555: asdx::Vector4(0.3f, 0.8f, 0.8f, 2.3f),
00556: asdx::Vector4(0.8f, 0.2f, 0.7f, 3.95f),
00557: asdx::Vector4(0.2f, 0.1f, 0.9f, -1.5f),
00558: asdx::Vector4(0.9f, 0.1f, 0.2f, -1.7f),
00559: asdx::Vector4(0.1f, 0.8f, 0.3f, -2.25f),
00560: asdx::Vector4(0.9f, 0.2f, 0.1f, -3.35f),
00561: };
00562:
00563:
00564: pSrc = m_WorkBuffer[0].GetSRV();
00565: pDst = m_WorkBuffer[1].GetRTV();
00566:
00567: auto pCB = m_LensGhostBuffer.GetBuffer();
00568:
00569: // レンダーターゲット生成.
00570: m_pDeviceContext->ClearRenderTargetView( pDst, clearColor );
00571: m_pDeviceContext->OMSetRenderTargets( 1, &pDst, nullptr );
00572:
00573: // ブレンドステート設定.
00574: m_pDeviceContext->OMSetBlendState( m_pAdditiveBS, blendFactor, sampleMask );
00575:
00576: // シェーダの設定.
00577: m_pDeviceContext->VSSetShader( m_pFullScreenVS, nullptr, 0 );
00578: m_pDeviceContext->GSSetShader( nullptr, nullptr, 0 );
00579: m_pDeviceContext->HSSetShader( nullptr, nullptr, 0 );
00580: m_pDeviceContext->DSSetShader( nullptr, nullptr, 0 );
00581: m_pDeviceContext->PSSetShader( m_pLensGhostPS, nullptr, 0 );
00582:
00583: m_pDeviceContext->PSSetShaderResources( 0, 1, &pSrc );
00584: m_pDeviceContext->PSSetShaderResources( 1, 1, &pMask );
00585: m_pDeviceContext->PSSetSamplers( 0, 1, &m_pLinearClamp );
00586:
00587: // 8個描画.
00588: for(auto i=0; i<8; ++i)
00589: {
00590: LensGhostParam param;
00591: param.MultiplyColor = colors[i];
00592:
00593: // 定数バッファ更新.
00594: m_pDeviceContext->UpdateSubresource( pCB, 0, nullptr, ¶m, 0, 0 );
00595:
00596: // 定数バッファ設定.
00597: m_pDeviceContext->PSGetConstantBuffers( 0, 1, &pCB );
00598:
00599: // 矩形描画.
00600: m_Quad.Draw(m_pDeviceContext);
00601: }
00602:
00603: // リソースを解除.
00604: m_pDeviceContext->PSSetShaderResources( 0, 2, nullSRVs );
00605: }
00606:
00607: // コンポジット.
00608: {
00609: // レンダーターゲットビュー・深度ステンシルビューを取得.
00610: auto pDstRTV = m_RenderTarget2D.GetRTV();
00611: ID3D11DepthStencilView* pDSV = m_DepthStencilTarget.GetDSV();
00612:
00613: m_pDeviceContext->ClearDepthStencilView( pDSV, D3D11_CLEAR_DEPTH | D3D11_CLEAR_STENCIL, 1.0f, 0 );
00614:
00615: // 出力マネージャに設定.
00616: m_pDeviceContext->OMSetRenderTargets( 1, &pDstRTV, pDSV );
00617:
00618: D3D11_VIEWPORT viewport;
00619: viewport.TopLeftX = 0;
00620: viewport.TopLeftY = 0;
00621: viewport.Width = float(m_Width);
00622: viewport.Height = float(m_Height);
00623: viewport.MinDepth = 0.0f;
00624: viewport.MaxDepth = 1.0f;
00625:
00626: m_pDeviceContext->RSSetViewports(1, &viewport);
00627:
00628: // ステートを設定.
00629: m_pDeviceContext->RSSetState( m_pRasterizerState );
00630: m_pDeviceContext->OMSetBlendState( m_pOpequeBS, blendFactor, sampleMask );
00631: m_pDeviceContext->OMSetDepthStencilState( m_pDepthStencilState, m_StencilRef );
00632:
00633: // シェーダの設定.
00634: m_pDeviceContext->VSSetShader( m_pFullScreenVS, nullptr, 0 );
00635: m_pDeviceContext->GSSetShader( nullptr, nullptr, 0 );
00636: m_pDeviceContext->HSSetShader( nullptr, nullptr, 0 );
00637: m_pDeviceContext->DSSetShader( nullptr, nullptr, 0 );
00638: m_pDeviceContext->PSSetShader( m_pCompositePS, nullptr, 0 );
00639:
00640: // シェーダリソースビューを設定.
00641: ID3D11ShaderResourceView* pSRV[] = {
00642: m_InputTexture.GetSRV(),
00643: m_WorkBuffer[1].GetSRV(),
00644: };
00645: m_pDeviceContext->PSSetShaderResources( 0, 2, pSRV );
00646: m_pDeviceContext->PSSetSamplers( 0, 1, &m_pLinearClamp );
00647:
00648: // 描画.
00649: m_Quad.Draw(m_pDeviceContext);
00650:
00651: // シェーダリソースをクリア.
00652: ID3D11ShaderResourceView* nullTarget[] = { nullptr, nullptr, nullptr, nullptr, nullptr };
00653: m_pDeviceContext->PSSetShaderResources( 0, 2, nullTarget );
00654:
00655: // テキストを描画.
00656: OnDrawText();
00657: }
00658:
00659: // コマンドを実行して,画面に表示.
00660: m_pSwapChain->Present( 0, 0 );
00661: }
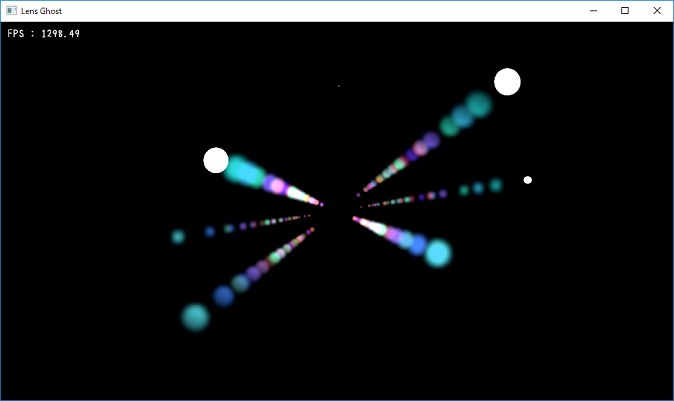
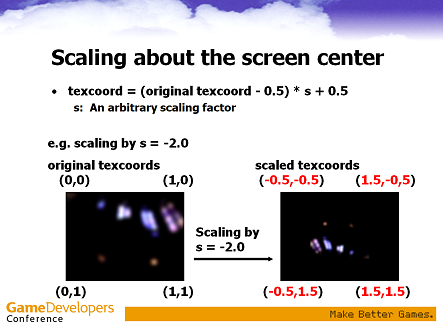
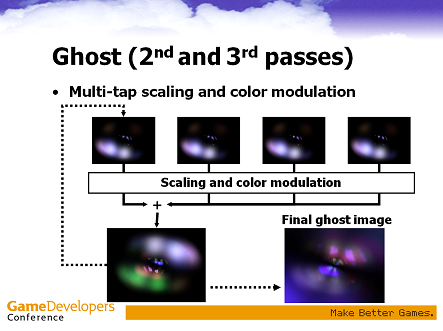
CPU側は入力画像をガウスブラーでぼかして,ゴーストの元になるテクスチャを生成します。あとはこれをゴーストを出したい分だけ書きます。GPUに送るパラメータはRGBに乗算カラー,A成分にテクスチャスケールを格納しています。パラメータは見た目が良い感じになるように調整したもので,とくに根拠はありません。色やゴーストの位置等を調整したい場合は485行目と552行目あたりに書いてあるパラメータをいじってください。
00007:  //-------------------------------------------------------------------------------------------------
00008:  // Inlcudes
00009:  //-------------------------------------------------------------------------------------------------
00010:  #include <vector>
00011:  #include <stb/stb_image_write.h>
00012:
00013:
00014:  //-------------------------------------------------------------------------------------------------
00015:  //      BMPファイルに保存します.
00016:  //-------------------------------------------------------------------------------------------------
00017:  void save_to_bmp(const char* filename)
00018:  {
00019:      auto w = 64;
00020:      auto h = 64;
00021:      std::vector<uint8_t> images;
00022:      images.resize(w * h * 3);
00023:
00024:      auto threshold = 0.5f * 0.75f; // [0, 0.5]
00025:      auto max_r = 0.5f;
00026:
00027:      for(auto y=0; y<h; ++y)
00028:      for(auto x=0; x<w; ++x)
00029:      {
00030:          auto px = (1.0f / w) * x;
00031:          auto py = (1.0f / h) * y;
00032:
00033:          auto dx = px - 0.5f;
00034:          auto dy = py - 0.5f;
00035:          auto r = sqrt(dx * dx + dy * dy);
00036:
00037:          float color = 1.0f;
00038:          if (r >= threshold && r <= max_r)
00039:          {
00040:              auto t = (r - threshold) / (max_r - threshold);
00041:              color = (1.0f - t);
00042:          }
00043:          else if (r > max_r)
00044:          { color = 0.0f;}
00045:
00046:          auto idx = x * 3 + y * w * 3;
00047:          images[idx + 0] = static_cast<uint8_t>( color * 255.0 + 0.5 );
00048:          images[idx + 1] = static_cast<uint8_t>( color * 255.0 + 0.5 );
00049:          images[idx + 2] = static_cast<uint8_t>( color * 255.0 + 0.5 );
00050:      }
00051:
00052:      stbi_write_bmp(filename, w, h, 3, images.data());
00053:  }
00054:
00055:  //-------------------------------------------------------------------------------------------------
00056:  //      メインエントリーポイントです.
00057:  //-------------------------------------------------------------------------------------------------
00058:  int main(int argc, char** argv)
00059:  {
00060:      save_to_bmp("mask.bmp");
00061:
00062:      return 0;
00063:  }

00013:  ///////////////////////////////////////////////////////////////////////////////////////////////////
00014:  // VSOutput structure
00015:  ///////////////////////////////////////////////////////////////////////////////////////////////////
00016:  struct VSOutput
00017:  {
00018:      float4 Position : SV_POSITION;
00019:      float2 TexCoord : TEXCOORD;
00020:  };
00021:
00022:  ///////////////////////////////////////////////////////////////////////////////////////////////////
00023:  // CbLensGhost constant buffer.
00024:  ///////////////////////////////////////////////////////////////////////////////////////////////////
00025:  cbuffer CbLensGhost
00026:  {
00027:      float3 MultiplyColor : packoffset(c0);      // 乗算カラー.
00028:      float  Scale         : packoffset(c0.w);    // テクスチャスケール.
00029:  };
00030:
00031:  //-------------------------------------------------------------------------------------------------
00032:  // Textures and Samplers.
00033:  //-------------------------------------------------------------------------------------------------
00034:  Texture2D       ColorBuffer  : register(t0);    // 入力画像.
00035:  Texture2D       MaskBuffer   : register(t1);    // マスク画像.
00036:  SamplerState    ColorSampler : register(s0);    // リニアサンプラー
00037:
00038:  //-------------------------------------------------------------------------------------------------
00039:  //      メインエントリーポイントです.
00040:  //-------------------------------------------------------------------------------------------------
00041:  float4 main(const VSOutput input) : SV_TARGET0
00042:  {
00043:      float4 result = 0;
00044:
00045:      float2 uv    = (input.TexCoord - 0.5) * Scale + float2(0.5f, 0.5f);
00046:      float4 color = ColorBuffer.SampleLevel(ColorSampler, uv, 0);
00047:      float  mask  = MaskBuffer .SampleLevel(ColorSampler, uv, 0).r;
00048:
00049:      result.rgb = color.rgb * MultiplyColor * mask;
00050:      result.a   = 1.0f;
00051:
00052:      return result;
00053:  }
